I know this aint a HELP forum but does anybody know any tips for taking good night shots■■?
I’ve tried the long exposure thing and got some good shots (For me!). Found the hardest thing was finding somewhere to take the bloody shot which was safe and suitable!!!
I need to illuminate the truck a bit more, any tips■■?
nowt wrong with them mate there good shots,it might sound a daft thing to say considering were talking night shots but if the lightings wrong it just wont look right and pics that look good on the camera screen look blurred when there on a bigger screen heres some ive took
Hi Gaz and everyone this is the best way and mode to take night shots, dependent on your camera.
I really struggled before until i got osme advice from someone who knows what there doing, anyway here it goes:
Quoted advice from a freind:
Camera on tripod (optional) set on Manual (M)
Shutter was open for 20 seconds (with a cable release) set on f5.6
Tip for night pic set the white balance (WB on back off camera) to Light bulb cuts the yellow light from street lamps , white balance can be accesed thorough the menu’s.
One trouble i have at night pics is focusing as auto focus struggles to focus in dark.
Another good tip and how i started of is use the “nightscene mode”
Hope this helps
James
PS: Gaz, how did you get the long streaks of red and yellow light on your photos, it looks wicked !
they are some great shots gaz, what sort of camera are you using? like truckerjames says play about with the white balance and the f settings, what i normally do, is take one on full auto, see what settings the camera uses then have a play about from there, hope this is of some help
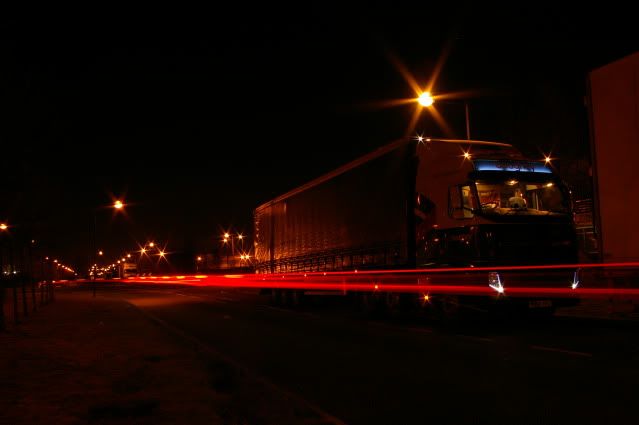
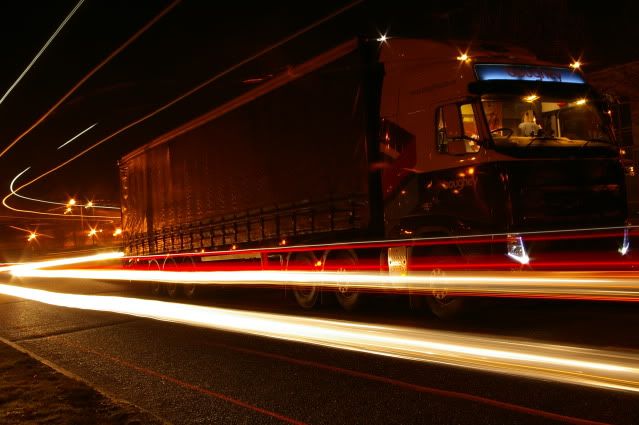
james the streaks are light trails from passing vehicles, you generally only need one to pass to get a trail (i cant find any pics now!)
Forgot to say the cable shutter is great, failing that just set a delay, mine has 2 secs and 12 secs options, avoids any shake, which destroys the shot!
If you work out the exposure, ie f/5.6 and for 30 seconds then once you have the tripod in place you can try and let the auto-focus lock onto a vehicle side light or something.
Carefully move the focus area to point back at the whole vehicle whilst not taking your finger off the trigger if you’re in auto-focus mode and then press the button.
Easier if you have a bridge camera, (ie halfway between DSLR and P&S (point & shoot) or an actual DSLR
Alternatively set the camera up and use a good torch to shine it where the camera focuses and then after it has a lock switch the light off having already set the exposure values and take the shot
Taking a photo at night with NO light and a few minutes exposure needs more creativity
Good luck I upgraded to a DSLR 5 years ago for such reasons
30 seconds at about f/7 and I sued my Surefire 6p torch to get a focus lock on the white MAN
Similar method, long exposure, on a tripod
Spent ages getting a lock and lining it up on manual focus then having took a few fots already a car was passing so I took that shot too with it going past. There may have even been more than one car in that shot passing
Taken on a foggy road at night. You can see where the shot ‘started’ with that cars tail lights just ‘starting’ there
Gaz:
I need to illuminate the truck a bit more, any tips■■?
Try painting the lorry with a flashlight. Zoomed, handheld and manually flashed flashgun can also do the trick, but aiming is harder. Idea is to take long exposure and illuminate subject with a light during that exposure. Result is that subject is clearly lit. Note that only ISO value and aperture (F number) matter when you are painting with a light. Exposure time is only important for ambient light (i.e. light coming from street lights etc.). Think about those trailing lights. They are “painted” with light.
Google for example “painting with light” for more info about this technique.
Colour balance is the hardest nut to crack - once you have the basics of tripod etc
I would personally shoot in RAW mode if your camera allows this – adjusting white balance on the computer is far easier than on the camera
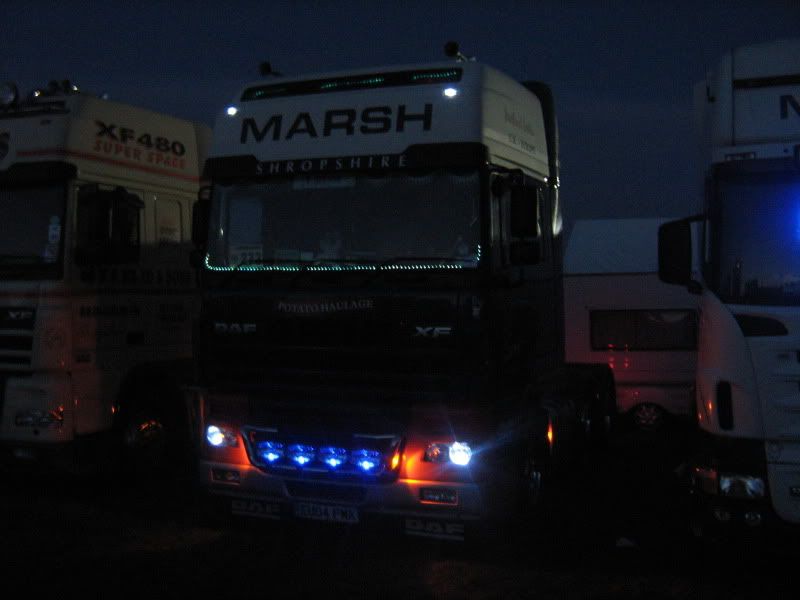
These were taken under yard floodlights - orang’ish but enough white light (full spectrum) to obtain realistic colours in post production:
Service areas have decent’ish lights that can be adjusted:
Don’t take the pics under sodium (orange) lights - it can be impossible to adjust for these colours (single frequency light) - unless you are looking for this effect of course - a black and white conversion is your friend here:
An illustration of (v basic) differing lighting conditions - this was in near darkness
This shot was a couple of seconds just painting the torch over the lorry -
This shot was pushed via the RAW file to about a 2 min exposure - the only lighting was some vague ambient lighting from far away - no torch
Light painting is much easier with a good torch than with a flashgun -