LGV TRAINING TIPS [Reworked 01/02/2022] (Read only)

LGV TRAINING TIPS - INDEX PAGE
Each post in this thread has a seperate link from the INDEX of links below.
In each post there is a link which returns to this INDEX.
An ‘External link’ is any link that takes you away from this page.

:smiley: PLEASE CLICK ON THE LINK YOU REQUIRE :smiley:

INDEPENDENT REVIEW SITE FOR LGV TRAINING PROVIDERS

Recommended LGV training schools by members of this site

MID 2022 PRICE EXAMPLE FOR THEORIES AND TRAINING (B TO CE)

Truckers’ Terminology… JARGON BUSTER

SO YOU WANT TO BE A TRUCKER?

Cheap Medicals

HOW DO I GET A TRUCK LICENCE ? including the INITIAL driver CPC.

BEFORE you book your training…READ THIS…

PRE ‘C’ (or ‘C1’) TRAINING TIPS

Training & using the tips + feedback

ON TEST SAFETY QUESTIONS + Video of the checks

GEARBOX OPERATION - A simple intro (With Pics)

And more GEARS - Range changes & Splitters (with pics)

DRIVER CPC - The 2 types - A very simple basic overview

TEST REVERSE ON RIGID & CONTROLLED STOP (With Videos)

TIPS FOR THE DSA C+E (ARTIC)

ARTIC + W&D TEST REVERSE + VIDEOS

ARTIC TEST UN/COUPLE (with pics by dieseldave)

EXAMINER TEST SHEET EXPLAINED

TIPS TO NOOBS FROM NOOBS

DRIVERS HOURS VIDEO

LINKS TO TRAINING BLOGS FROM NEWBIES

RATCHET STRAPS, CHAINS, & ROPES (With VIDEOS)

SOME USEFUL LINKS

HOW TO OPERATE CURTAINSIDERS

Please CLICK HERE to post comments or feedback on this thread - Thank you.

This is the original draft by Mothertrucker and I have her permission to post it on here :smiley: :smiley:
= = = = = = = = = = = = = = = = = = = = = = = = = = = = = = = = = = = = = = = = = = = = = = = =
SO YOU WANT TO BE A TRUCKER?

Some kids dream about being firemen when they grow up and others want to be doctors, vets or lawyers but a good majority want to become truckers.

Maybe this is because Dad or uncle was a trucker. Maybe it’s because they have the image in mind of the handsome hunk stepping out of his big rig, Yorkie bar in hand then idly kicking his firm hard tyres while the local ladies swoon in ecstasy.

Or maybe you believe that it could be a good job with a decent wage, being pretty much your own boss, enjoying the freedom of the road and not being shut in an office or a factory all day.

Whatever the reason there has never been a shortage of wannabe truckers, eagerly sending off for the paperwork to get them started on the road into the haulage industry.

Now then, before we get carried away with dreams of swinging a huge juggernaut along the sweeping roads of Europe and beyond, just stand back and ask yourself, do you really know what the haulage game is all about and what life on the road is really like.

If your idea of being a trucker brings visions of Smokey and the Bandit flashing into your head with exiting chases across country with the loads miraculously staying intact throughout, or of Red Sovine and his kindly pals befriending a pathetic little boy named Teddy Bear on the CB and finding the time to go off route to give the kid a truck ride before he dies, then forget it.

In true life it could probably be more like Slim Dusty’s iconic song ‘Lights on the Hill’ with drivers enduring lousy road and weather conditions, sometimes with nil visibility after a long day juggling with drivers hours, impatient Transport Managers and loads with no paperwork.

But hey guys, don’t listen to me! If you want to be a trucker then good luck to you. You go right ahead and join the valuable band of professional drivers without whom we all, as consumers, would surely be in trouble.

Without trucks and truckers there would be no goods on the supermarket shelves, or in any shop for that matter. From cans of Alphabet soup to Zookeepers uniforms, if you have it then it came on a truck, driven by a trucker, so you go right ahead and go for that job. It’s one you can be proud of.

But of course, the first thing to do is actually get on the road and that means obtaining an LGV licence. This is the first stumbling block that each new trucker must face. Like any other industry there are rip off merchants out there just waiting to part you from your hard saved cash and give you very little in return.

Let’s look at the options. You can go on the Internet and type in ‘LGV Training’ and see what comes up. Well I can tell you that you will be faced with page after page of tempting adverts from training providers, each telling you that their training methods and prices are far superior to any other. The websites are professional and the offers look hard to beat - but hold it right there.

There are a number of businesses that work simply as middle men. Recruitment agencies for LGV driving schools. They advertise LGV training and give you plenty of interesting and enthusiastic blurb over the phone but they are not driving schools. They simply take your money then pass you on to a local driving school for training. It’s perfectly legal, but will cost you a lot more money than if you had gone directly to the driving school yourself. It makes no sense to use these recruitment agencies at all. You get ripped off by a few hundred pounds for the Agencies ‘finding fee’ and the driving school that the agencies use often have to give reduced rates to the agency for sending them the trainees.

Answer me this. If you were to buy an item for your home would you rather go direct to the manufacturer and buy at wholesale price or would you rather let your local shop buy it in for you and then you pay the inflated price after they have put their profit on? Easy to guess which is best so do your homework.

Also trainees who have been sent by such agencies often get shorter training hours due to the discounts the driving schools have to give the procuring agencies. Not all driving schools give shorter hours of course but some do.

While you are on the net visit the Trucknetuk website and go onto their wannabe drives page. Well worth a visit for help and advice and also word of mouth recommendations for an LGV driving school in your area. Personal experience and honest recommendation is worth a lot more than any fancy advert.

I would strongly advise any wannabe trucker to check around locally and find out what schools there are in the area and go and visit personally before booking.
Check out what sort of trucks they have and what condition they are in. Speak to the instructors and get a feel of how you will get on with them. Hopefully they will be friendly and helpful and answer any questions that you may have about the training or prices.

Also — and this is important — ask what length of courses are on offer and make sure you are clear about what the school is offering. Preferably get it in writing. Many schools or agencies will simply quote that you will be getting a ‘One Week’ course for your money. Make sure you clarify what exactly is ‘one week’. I very much doubt it will be seven days — more like a ‘working week’ of five days made up of four days training and test on day five. Also check out how many hours each day you will be getting and do your sums.

Also ask what sort of course the school is offering. Is it a ‘solo’ course or a ‘joint’ course. This is also important and needs to be clarified before parting with any of your hard-earned cash.

A lot of schools will take you out with a second trainee in the cab for the day. This is a ‘joint’ or ‘shared’ course or ‘two to one’ training - Two trainees to one instructor. You will be out in the truck from around 8am to 4pm with both trainees taking it in turns to drive. The plan would be that both get a fair crack at the hours but this does not always work out to plan and one driver often gets more than the other. Allowing for tea breaks and a dinner break you will probably be getting three or maybe three and a half hours a day behind the wheel. This is usually only over four days as the test is then taken on the fifth day which is counted as part of the training week.

Quite often these courses can work well, as the idea is that the trainee sitting in the passenger seat learns more as he watches the other trainee under instruction. This works for some but not others so consider which is best for you.

Some driving schools will offer a ‘solo’ course or ‘one to one’ training, which is just you and the instructor in the cab each day. This can be tiring if the training day is a long one, but a good instructor will allow for plenty of stops for a cuppa or just an engine off break. This is a good opportunity to go over the last couple of hour’s drive verbally and iron out any problems before getting back on the road and putting into practice what you have just discussed.

Once again make sure you ask how many hours your course consists of rather than days. This way you will know exactly what you are paying for. Personally I am a great advocate of one to one training as the results usually speak for themselves, but some driving schools will only offer two to one, so make sure you clarify which sort of course you will be getting and how much you have to pay for it.

Another thing to look at is what sort of licence do you want to go for. Do you want to take the simple route and get your Cat C and drive only rigids, or do you feel it’s better to take it that one step further and go for C+E and drive Artics for a living.

Either way the choice is yours. Many drivers have happily driven rigids for all of their working lives and would not want to change while others would not be parted from their ‘Bendies’. It’s all a matter of choice — YOUR choice — so don’t let any driving school or recruitment agency talk you into paying for something you don’t want — or need. If you only need a rigid licence then do not be talked into any special offers or discounts for booking up for C+E. If you don’t need the bigger licence then why part with any more cash than you have to?

Regardless of how far you want to take it, I always strongly advise any up and coming truckers to take it one step at a time. Don’t fall for any strong sales talk or discounts on booking back to back courses. Book your rigid course and concentrate on getting past the test. When you have passed then go ahead and book your Artic course if you still want to take it further.

Any discount offered is hardly worth the extra pressure you will have put on yourself to get a first time pass in the rigid so that you can go on to the next stage. No good driving school will try to twist your arm to book both courses — but sadly some will, so beware of that and don’t be talked into anything you did not originally want.

Another thing to be aware of is that a lot of recruitment agencies and schools are insisting that their trainees go for the Drivers CPC before taking the training. Once again don’t go there unless you really want to. The drivers CPC does not come into force in law until September 2009 so there is plenty of time. Also any driver holding a full LGV licence at the time automatically gets the CPC as he is already on the road. This will be valid for four years before it has to be renewed. So don’t worry about anything that you don’t have to worry about. Just concentrate on the driving and getting past that test.

The other important thing when going for C+E is to make sure what sort of vehicle your driving school uses. Many schools use artics for their Cat C+E training but lots use wagon and drag. Ask yourself what YOU want to take your test in.

Both wagon and drag and Artic are C+E vehicles so you will get the licence whichever you take the test in. The plus points for taking your test in a wagon and drag is that usually you will take your first test in a the rigid vehicle that is then used to hook up the drag so you are then driving a familiar vehicle so this does have some merits. This is good so far but when you have passed your test and go out to work, the downside is that you can be pretty certain that you will be expected to drive an Artic — which is a completely different animal.

I know many drivers who have passed their C+E in a wagon and drag and then had to find a school that would take them out for a day or two training in an artic so they could handle it. Not the best panic situation to find yourself in when offered your dream job is it?

So if you do chose to take your test in a wagon and drag then be prepared to find someone who will take you out for a few days in an artic before you venture out alone. It’s far better than coming unstuck — and looking like a complete plonker on your first day with a new company.

Or better still find a driving school that uses artics for their C+E training right from the start. Any driver that can handle an artic has little or no trouble using a wagon and drag but it does not work the other way around sadly, so be aware of this.

Well now, if you still have the desire to leap high up into the cab of your own gleaming truck, roar the engines into life as you snap off a chunk of Yorkie and blow your air horns in farewell as you drive off into the sunset (Yeah — right!) Then good for you. You will be joining some of the nicest men and women on the road and one of the best industries in the world. When people ask you what you do for a living you can hold your head up high and proudly announce - “I’m a Trucker!”

by Wendy Glindon - Mothertrucker

RETURN TO INDEX

WELCOME TO

This post will take you through the required steps to become a truck driver and the
INITIAL DRIVER CERTIFICATE of PROFESSIONAL COMPETENCE
All the links in this post are external ones.

New UK LGV licence training rules were introduced late 2021 where a B (car) driver can now go directly to LGV CE (artic/wagon & drag) without the need to pass the LGV C rigid test first
There is also the addition of an extra off road reverse un/couple module/test (3a) which used to be done in module 3 with the on-road driving test (now the module 3b test)

If you have already passed LGV C then to get LGV CE you just need to pass modules 3a and 3b

Most LGV training is done with an automatic gearbox but as long as a manual B licence is held then the pass will be both automatic and manual

The 5 modules required came into effect late 2021
The age for driving all the LGVs (C1, C & C+E) is now 18.*
You will need all 5 modules in order to gain the licence and have the right to drive LGVs commercially.

If you already have pre 1997 C1 on your licence then you will need modules 1a, 1b & 3a, 3b as well as 35 hours of periodic driver cpc hours or initial modules 2 + 4 (your choice) to obtain a C.

__*__If you are under 21 then all 5 of the INITIAL driver CPC modules MUST be passed in order to drive any C (or CE) LGV whether for commercial or private use. This is because the INITIAL driver CPC replaces the Young Drivers Scheme (YDS). This does not affect the private driving of C1 trucks such as 7.5 tonne horseboxes.

Some useful links: -
MODULE 2 PRACTICE
The Idiot’s Guide to becoming a Trucker.
Truckers Ackronyms & Synonyms
All the theory & CPC books/CDs in one package

SAFETY, LAW AND WORKING TIME DIRECTIVE FORUM (INTERACTIVE) For questions and answers on Drivers’ Hours, ADR etc.

ANOTHER NEWBIE:
“Can anybody explain the process over the forum as to what I have to do to start with so I can tick off on paper?”


LGV C (Rigid) Old HGV Class 2:
Anyone who passes their car driving test and wants to drive a large goods vehicle will need additional training to be brought to the DVSA standard. The vehicles used will also have to conform to the standards as set by the DVSA.

The STEPS to take…

STEP 1
Have a medical to prove you are physically fit to drive a Large Goods Vehicle using Form D4 of the pack (obtainable from various driving schools).
Download the 8 page D4 Medical Form Using this Link Please print (colour, not black & white) and take to your GP if you have the facilities at home or work.
Please contact your GP or visit driversmedicals.com who can provide low-cost medical examinations.
THIS LINK will take you to a list of some cheap medical places around the UK.

STEP 2
Obtain your provisional licence.
You can order a D2 Form by clicking on gov.uk/dvlaforms (MARK FORM FOR C NOT C1) Forms can often be obtained from the Post Office or Training schools
LGV CE provisional is automatic when ticking the C provisional box
A good idea might be to also tick the D provisional as this will save you from having extra medicals in the future should you wish to persue a PCV licence
Driving Licence Codes

Having completed forms D2 & D4 send with your licence to the DVLA in the enclosed envelope, I recommended that you send it record/registered delivery and photocopy your licence, the paper part and both sides of the photocard, as well as getting the copies signed by a responsible person such as a policeperson, teacher, doctor etc before sending. Your licence with provisional entitlement will normally be returned within 2 to 4 weeks.

STEP 3
Book your INITIAL DRIVER CPC Training.
These modules are not for C+E upgrades
Modules 1a, 1b & 3a, 3b are for obtaining the LGV licence.
Modules 2 & 4 are for obtaining the right to drive LGVs commercially
Modules 1a, 1b & 2 are taken at a DVSA theory test centre
Modules 3a & 4 are taken at a DVSA LGV practical test centre.
Module 3b is taken at the training centre off road area by an instructor but not by the instructor who trained you
It might be worth checking that the training school can train you in all 5 modules otherwise you could find yourself having to travel to different places to attain all the 5 modules required, however, you do not have to do all the modules with the one provider. It may work out cheaper to shop around and do some of the modules with different providers.
TIP - get a quote for the actual number of ‘behind the wheel’ driving hours from training providers and not the number of days.

INITIAL DRIVER CPC
This is made up of 5 modules and includes the previous theory and practical tests.
All 5 modules must be passed before being allowed to drive LGVs commercially.

MODULE 1 - Theory
This is split into two parts

Theory - A good idea is to get the book /CD rom + HPT (Hazard Perception Test) again, you can get CD rom to practice.
For course reading material Click here
An idea to consider is to get in touch with LGV school and, for a fee, they will train you.

Module 1a consists of 100 multiple choice on-screen questions

Module 1b consists of 19 video clips containing 20 hazards (HPT - Hazard Perception Test)

  • A pass mark of 67% is required
  • Cost of this test is £11.00
  • Candidates will be allowed ½ hr to complete this module.
    If either test is failed then only that test needs to be retaken - not both.
    Videos of Hazard awareness & The DVSA HPT test are to be found at the bottom of this post.
    NOTE: The DVSA HPT pass is valid for 2 years but a separate HPT must be done for the LGV - the car HPT pass is not valid for LGV (or PCV)

[MODULES 1a & 2 PRACTICE (small cost)]

MODULE 2 - Case Studies

  • Each test will be made up of 3 realistic scenarios (from a bank of 7) a driver may encounter in their working life - each one with 6-8 questions, with a possible maximum score of 50 (of which the pass mark will be 38 ).
  • Candidates will be allowed 1½ hrs to complete this module.
  • Cost of this test is £23.00
    This will be taken at the same test centre as Modules 1a & 1b and can be booked to be done on same day

MODULE 3a - Off road reverse and un/couple test - this is valid for 6 months

  • Cost of this test is £40.00

MODULE 3b - Practical on road Test. (Modules 1a, 1b & 3a must be passed before this test can be taken)

  • Practical on-road driving test.
  • Including an Eco-Safe Driving assessment - this will not contribute to the result of the test.
  • Actual on-road driving time for all C (rigid) categories will be a minimum of 1 hour.
    Test Criteria:
  • Answer approximately 5 questions on basic vehicle checks.
  • Test may also include hill starts and motorway driving.
  • Cost of this test is £115.00 but is usually included in the training school course fee.

MODULE 4 - for the (IDCPC)
Practical Off-Road Test (Module 2 for the (IDCPC) must be passed before this test can be taken)
This will be taken at the same test centre as Module 3 - it may be done on the same day or a separate day - it depends how the test centre have organised their scheduling

During the test you will be required to demonstrate your knowledge and ability in the areas listed below:

  • Ability to load the vehicle with due regard for safety rules and proper vehicle use,
  • Security of the vehicle and contents,
  • Ability to prevent criminality and trafficking in illegal immigrants,
  • Ability to assess emergency situations,
  • Ability to prevent physical risk. Emphasis will be on you to demonstrate your ability e.g. through a physical walk-round vehicle safety check.
    The test consists of 5 questions which cover the Driver CPC syllabus. For each of the questions the examiner will require you to demonstrate your knowledge in the syllabus areas mentioned above, which could involve you carrying out actions such as walking round the vehicle pointing out relevant parts of a vehicle, or demonstrating the use of relevant parts of the vehicle. Each question equals 20% of the overall pass mark. To pass the test an overall score of 80% must be achieved, with a score of at least 15% in each question.

LGV tests will also see the introduction of a new piece of equipment called the ‘Load Securing Demonstration Trolley’ (LSDT) which will allow you to demonstrate your ability to secure loads using a variety of methods including ropes, chains, straps, etc.
The Load Securing Demonstration Trolley (LSDT)

lsdt.jpg

  • Cost of this test is £55.00 and includes the Driver CPC Qualification Card (DQC) fee
  • Test will last ½ hr.

DVSA accredited training test centres can now conduct the mod 4 tests with in-house trained examiners - those tests are booked directly with the school and not through the DVSA booking system

All fees are for weekday tests - tests outside normal hours will cost more.


The DRIVER CPC is not the same as other CPCs
Link to The Periodic (ongoing) Driver C.P.C. (PDCPC)
DIGI SMART CARDS are usually required by agencies if you work for them but you are responsible for getting one. If you work for a non-agency they might be nice and pay for it but don’t hold your breath!
TOTAL COST to get from B to C+E it is recommended to have £3,500 ready in case of a retest or two

This is a link to a common weekend driving assumption by some newbies in order to gain experience whilst still in another job.

RETURN TO INDEX

TruckNetUK Help File From this thread wrote -

There are many posts on this site that have cited certain National Training Providers for not being fully transparent with their advertising and not explaining EXACTLY what the trainee is letting themselves in for :exclamation:
Some claim they have many training centres - they don’t :exclamation: - they act as ‘middlemen’ and farm out the work to other training schools and taking a slice by way of commission in the process.

For example, a provider might seem to be giving something away for free such as a C+E course if you pass a CPC (Certificate of Professional Competence) course but beware, there will be time constraints on doing this :open_mouth:

Check exactly what they are asking you to do - is it a DRIVER CPC course which is not in force until Sept 2009 and is like ongoing basic training for LGV drivers, or a NATIONAL CPC (Operators) course which is only needed if you are going to run your own vehicle or a fleet of trucks :question: :question: :question:

The ‘operator’ CPC is not a legal requirement for a driver, and there is NO legal linkage or conditions about gaining a NATIONAL CPC to enable someone to upgrade to a C+E driving licence.

The NATIONAL CPC course only has 4 exam slots each year and is of an ‘A’ level examination standard.

If you pay one of these National Training Providers then, unless you have paid by CREDIT card, you may be unable to get a full refund once you realise that you have ‘been legally duped’. Always check with your card provider beforehand.

The general advice from the members of this site is to book your training with a company that has their own vehicles and instructors and, where possible, to get a recommendation from someone who has previously trained with them :smiley: :smiley: :smiley:

Ask questions…

Should I have an Assessment drive? (Your personal choice on this point)
How much is an Assessment drive?
How much is the full course?
What does that include — VAT? Medical? , Theory test training? Theory test fee? Theory book? HPT (Hazard Perception Test) CD rom?
How many behind-the-wheel training hours will I get before my test?
Do you offer 1 to 1 & 2 to 1 training so that I can opt for what is best for me?
If I do not pass first time, how long till I get a retest?
What is the TOTAL price to take a retest?
If my course (or test) is cancelled at short notice by you for any reason, will I get full compensation such as loss of earnings if I will have to take more time off work?

There have been various posts on this site about these National Training Providers and can be accessed by using the SEARCH facility at the top of the page - just input the name of the provider you wish to check on. :smiley: :smiley:

THIS LINK will give you another members’ personal observation on the way that they operate and is well worth a read :smiley: :smiley: :smiley:

And this link HGV Training Brokers Named is well worth a read

RETURN TO INDEX

:smiley: :smiley: :smiley: WELCOME :smiley: :smiley: :smiley:

INDEPENDENT REVIEW SITE FOR LGV TRAINING PROVIDERS

The LGV training schools listed below have all been recommended by TruckNet members but may have listed on here some years ago.

Please scroll until you see the county in which you wish to train.

SCOTLAND

Aberdeen ABERDEEN TRAINING SERVICES / MCPHERSON /

Ayrshire JIM MAIR /

Borders JIM PAXTON /

Dumfries NITHCREE /

Glasgow GTG / RITCHIES / HIGHFIELD HEAVIES /

Inverness MURRAY FIDDES /

Midlothian SCANIA / GTG /

Perth ALEX MCARA /

West Lothian CTTS /

========================================================================

NORTHERN IRELAND

Antrim DAVID KINNEAR / SWIFT /

========================================================================

WALES

Carmarthenshire CROSSHANDS /

Clwyd GATEWEN /

Flintshire CHEVRON / P&G Driver Training

Glamorgan RED DRAGON /

Mid Glamorgan DLT /

Monmouthshire D.H.JONES / HEADS OF THE VALLEYS /

Swansea DRIVER TRAINING (WALES) /

========================================================================

ENGLAND

Avon LEARN TO DRIVE ME /

Bedfordshire CTT /

Cambridgeshire APEX / PETER SMYTHE (FORUM SPONSOR)

Cheshire STOCKPORT /

Cornwall CELTIC / CENTRAL / DRIVELINE / WESTCOUNTRY

■■■■■■■ NITHCREE / SYSTEM GROUP /

Derbyshire AIM HIGH (2022) / SHAWS / SHERBURNS(2022)

Devon BIG WHEELERS / FAIRWAY / FCD / SRTS / TAUNTON TRAINING / TRANSPLANT MASTERTRAIN /

Dorset No recommendations yet /

Essex CROWLANDS / FLAIR TRAINING / KEEP IT SIMPLE / KEITH WILLIAMS / ROADTRAIN / ROBINSONS / SCANIA /

Gloucestershire C&G / SCANIA / SOMAX / UNIVERSAL /

Hampshire 2 START LTD / HAMPSHIRE TOWING /

Herefordshire No recommendations yet /

Hertfordshire ACE / ROADTRAIN /

Kent ALANS / GORDON SPRINGATE / KENT METRO /

Lancashire ENTERPRISE / FORD & WILLIAMS / HGV TRANSPORT TRAINING / HINDLEY GREEN / LANTRAIN / RED ROSE / RIBBLE VALLEY / TOWN AND COUNTRY / WIGAN /

Leicestershire ATT / DATA ACADEMY / HUGHES & A1 / J.COATES /

Lincolnshire BOSTON(2022) / DENBY / JM TRUCKING / PRIESTLEY / SCANIA / SDS / TRANSAFE

Merseyside AJM / North West HGV Transport Training /

Middlesex BAINS / WALLACE /

Norfolk COMPASS / EAST COAST / MARTINS \ MDT /

Northamptonshire AE Driver Training and Recruitment / EDDIE STOBARTS / J.COATES / LGV TRAINERS / POWERDRIVER

Nottinghamshire J.COATES / PETER SMYTHE (FORUM SPONSOR) / RUSHTON / SCANIA /

Oxfordshire JLD /

Shropshire AVT TELFORD / DULSON

Somerset LGS / TAUNTON TRAINING /

Staffordshire BASSETTS / BLUE TRIANGLE / BRITISH HGV / CENTRAL / MTS / SID / TRANSED /

Suffolk Total Driving /

Surrey EP TRAINING / SURREY AND HAMPSHIRE HGV TRAINING

Sussex LANCING /

Teeside TLGV /

Tyne & Wear TTS / TWINWAY / TYNE & WEAR /

Warwickshire A1 TRAINING GROUP /

Wiltshire WTTL /

Worcestershire PHIL BROWN

Wolverhampton MTS DRIVER TRAINING SERVICES

Yorkshire APEX / ATKIN / ATLAS / DAC / GO LGV / L & T / SCANIA / TAL / TOCKWITH / WELWYN /

If a school is not listed here, that does not necessarily mean that it is not good. It just means that no-one has recommended it, maybe because no members have trained there.
The general consensus from the members of this site is that you check out as many of the LGV training schools as possible that are LOCAL to you before making your final decision.

Please PM a Moderator (repton, Mike-C, ROG or dieseldave) with any links where members have recommended a training school on the forums - thank you. If County incorrect please let one of us know

Disclaimer:- The above list has been compiled from information provided by members of TruckNetUK and should in no way be regarded as an authorative assessment of their qualifications, competentence, or financial standing. A recommendation in this section simply means that a TruckNetUK member believes that they have received a good service at a price they believe to be fair. Similarly, the exclusion of other training providers should in no way be construed as a detrimental reflection of them.

RETURN TO INDEX

This page contains advice on THINKING/PLANNING AHEAD, BRAKING, COVERING GEAR, PAINT, LANE MARKINGS, POSITIONING & ROUNDABOUTS.
Please scroll down to see them.

GENERAL DRIVING TIPS BEFORE STARTING LGV C TRAINING

I personally recommend the book MIND DRIVING (External Link) as a way to improve the thinking aspects of driving.

A number of LGV instructors are finding that the general driving standard of many trainees coming to do their LGV ‘C’ course is not at a very high standard.
There have been a number who ‘THINK’ they are good but instructors find themselves having to go ‘BACK TO BASICS’ before they can really start learning how to handle a truck.
For the trainee this means wasted time on the course and that means that the trainee is paying good money to be taught how to drive again :exclamation:

gnclogan:
My trainer said, “I’m not teaching you HOW to drive, I’m just upgrading your license!” and he’s right, if you know how to drive, know your highway code, it’s just a bigger vehicle and slightly different gearbox.:

There are a number of things that a driver can do before starting their first LGV training course to improve their general driving.

The obvious ones are to practise the DSA procedures, which could mean losing the rear view mirror, and then, every time to set off, doing the mirror, mirror, blind spot routine. Checking BOTH side mirrors before moving within the lane you are in, signalling or before the increasing & decreasing of your speed.

Krankee:
INDICATORS
Use them. :smiling_imp: :smiling_imp: It does not, as 90% of the motoring public seem to believe, get added to your domestic electricity bill. :unamused: :unamused:
Remember that indicators are there for the purposes of communicating to other road users what you intend to do, and not what you’ve already started doing.
:slight_smile:

The less obvious is to practise forward planning — the THINKING bit.

A good way of doing this is to use your brakes a lot less than what you do at present — sounds daft but think about it — to use the brakes less then you will have to ease off earlier — to ease off earlier you will have to plan ahead more.

I don’t mean by changing down through the gearbox either as that will waste fuel. :cry: :cry: :cry:

A good example would be when approaching a queue of standing traffic, which is waiting for traffic lights to change or waiting to enter a roundabout.
The moment you see the queue, check mirrors and ease off in the gear you are in. let the vehicle slow down on it’s own, dipping the clutch as necessary to control any possible stalling. If the vehicle gets to the lowest gear speed (usually first gear) then engage that gear.
If, whilst easing off, you anticipate that the traffic is going to proceed, then engage the gear that will take you with them without rushing up to the rear of the queue.
You will be leaving a large area of tarmac in front of your vehicle when you ease off early. If another vehicle goes into the gap then re-adjust to accommodate it. If you curse at the vehicle that went into your forward space then decide if a few feet of tarmac is worth getting stressed over!!

When following other traffic, do you touch your brakes when they touch theirs? — If yes, then you are too close. Back off so that you can ease off without the use of brakes. Again, this requires a good deal of forward planning, which will be very useful when you drive a truck.

The general idea is to never stop but to keep moving forward even if at a very slow pace.

If you have to use the brakes then plan to use them gradually. Start by taking up the play of the pedal then resting the weight of your foot & leg on the pedal. That is then followed by squeezing down onto the pedal and squeeze down to a depth that will do the job during the middle of your braking so that you can ease off the pedal well before you actually need to come to a stop.

Loose the rear view mirror in your car now - pull push on the wheel where possible - MSM (Mirror, Signal, Manoeuvre/Brake) — it is very easy for the examiner to watch you brake or signal before checking BOTH mirrors and mark you down for it! Blind spot to your right when moving off - try to slow down before roundabouts and get 2nd in your car with the clutch lifted so that you drive up to each one in second (good practise for getting the covering gear)

COVERING GEAR
A “covering gear” is a flexible gear that you are likely to be asked to engage on the approach to certain hazards such as roundabouts.
Example; You are in a 40 limit with gear 7 engaged (8 speed gearbox) and there is a roundabout ahead and there are no other vehicles between you and the roundabout . The roundabout has the triangle bit of ground just before it with the “keep left” sign on the apex (I am crap at words so please excuse - drawing would be better!). By the time you reach the sign you will have slowed down to a speed (usually around 20 mph) that will engage your covering gear (usually 5th) by changing to it directly from the gear you are currently in (it is called BLOCK CHANGING) with the clutch fully engaged. This will allow you to approach the RBT in a FLEXIBLE gear, giving you TIME & SPACE to assess the situation. If clear you will proceed in the covering gear or if not clear and you have to slow down, you will brake and engage one of the “LIFTING” gears in preparation for a very slow start or a “stop & start”. A lifting gear is one of the low range gears - usually 1 to 4 - and with an empty lorry you can usually use any of them from a standing start - I say usually because your lorry might not like a 4th gear start on anything except downhill and may require 2nd on an uphill start.
Hope this helps and excuse if not written well.
PS I usually find that drivers do not use enough DEPTH in their braking once they have started to press down the pedal which means they are going too fast to complete the gear change in time. Once your foot is on the pedal and starting to squeeze then SQUEEZE, SQUEEZE & MORE SQUEEZE - get the speed down to what you need by when you want it. If you find you are braking too early in your early training - SO WHAT - better than braking late - you can always engage the covering gear and increase the pressure on the accelerator!
Please don’t say what one trainee said:

“but I am holding up the drivers behind me!”

PAINT
Why do they put paint on the roads — why not raised barriers between lanes etc? BECAUSE IT IS THERE FOR YOU, AS LORRY DRIVERS, TO GO ON!
If you need to go on the paint to carry out your drive then use it when safe to do so and if someone else is on it — WAIT for it to become clear for your use.
Do not steer into an area you do not plan to go into, as this will cause you to put your rear wheels in a place you do not want them to be such as over a kerb or knocking down the lamp post etc! This type of action is marked as a serious or dangerous steering fault on test and is therefore a fail.

LANE MARKINGS
As a car driver, it does not matter if you are going to turn right or go straight on and you get into the right hand lane when there are 2 or 3 lanes that go in that direction but it does matter when you are a lorry driver. You need to be on the inner lane that goes in the direction you are taking so look carefully on the approach for the arrows or place names that signify where each lane is intended for. You may find these marked on the road or on sign boards so look for them. Practise in your car as the examiner can mark you for not choosing the correct lane. (On test, if vehicles are stationary over the markings, the examiner should tell you which lane is which).

POSITIONING
You can also practice positioning by putting your car where you would put the lorry. For example, positioning against the white line on left bends and tucking well in on right bends - you can also do this on laned roundabouts by using the maximum available space in your lane.
Ever noticed how those clever road designers put the drains on a left bend on your nearside to keep you towards the white line and on a right bend you do not have any so you can keep well to the left :exclamation:

ROUNDABOUTS
whilst waiting to enter a roundabout do not look at the traffic that is blocking you from going - look everywhere else - what position are approaching vehicles taking.
If they intend to go ‘road ahead’ they usually position on the left but if turning right across your path they usually position to the right on the opposite approach. I have seen so many wait for vehicles on the inside of a roundabout because they thought they might come around it but were, in fact, just straightening out the roundabout to go straight on into the road you are coming out of - why :question: - because the driver did not look across the roundabout to see their position on the approach.
Getting marked for UNDUE HESITATION. If you miss a small safe opportunity to proceed then this will incur a MINOR on the examiner test sheet but if you miss a blatently easy opportunity to proceed then this will be viewed as a SERIOUS and therefore a fail. THE TIME YOU ARE WAITING HAS NOTHING TO DO WITH IT.

TIP - The handbrake on most lorries can be fully on (locked) or held in a position that is on but not fully on. This can be useful when stopped at a roundabout or junction.
No chance of an opportunity to emerge - keep handbrake fully on (locked).
An opportunity MAY be coming - handbrake released from fully on but held on.
This method also give a slightly quicker ‘GET AWAY’ when the decision has been made to GO.

A 4 minute video insight into LGV driving - http://ie.youtube.com/watch?v=7Q6kLdKKKMY

RETURN TO INDEX

Written & posted by neil1024 on another thread: -

Having been a keen follower (and occasional poster) of this site for a while now it’s time that I put something back into what is an excellent source of information and help. To all of you who have (mostly unknowingly) helped me — thank you. :smiley:

And of course to Rog and other contributors in the New and Wannabes section of the forum for guidance on the whole process from the forms, medicals, theory tests and everything else.

I passed my C Test (first attempt) at Swynnerton two weeks ago this Monday, :smiley: did an artic assessment drive last Wednesday and start C+E training next Tuesday with my test on Friday 13th. :open_mouth: And it’s a good job I’m not superstitious!

I’ve tried to keep this as feedback to Rog’s training tips (and/or questions raised by others) rather than a blog. That’s elsewhere and I’ll post a link in due course when I get it finished. So grab a brew or something stronger and have a read….

Why and especially Why in the Current Recession?

I have always driven extensively as part of my job (Sales). Anything up to 1,000 miles a week and always had great respect and empathy for truck drivers. Having been made redundant four times in the last five years (and being over 50) I have finally taken the hint! :confused: I joined this site in 2006 while then out of work for 9 months. Just as I was about to start LGV training, I got a job in my old line of work that lasted until November last year. So out of work again it is either driving a truck - or a till or shelf in a supermarket. :open_mouth: I know what I want to do!

So, yes I know how difficult the job situation is (even for experienced drivers) but while I have the time and money I am determined to get my licenses so that I have another string to the bow when things do eventually pick up. Even if I can get a job in the industry I came from (and that’s a big “If”) I will be prepared next time I’m dumped on the street!

For those that have asked before, no-one made false claims to me about getting jobs or shortages of drivers but that’s mainly because this forum kept me in touch with reality. I also chose the training departments of two large companies in the transport industry (though paying my own way at the going c. £2k rate, C and C+E) for both C and C+E courses on the basis that in better times there was a good chance of a job-offer with both them at the end of a successful pass, even for a newbie (they prefer their in-house-trained drivers). That route is pretty unlikely now too, but I felt the best option.

Pre Training Tips

Hugely useful Rog and thank you.

From the day I was made redundant (early October, I kicked off all the forms and got myself a £49 medical at driversmedicals.com and applied for a provisional C license), I dipped the central mirrors on the cars I drive and have not used them since. I drove everywhere (and still do) DSA-style, taking the full lane-width and thinking about kerbs and rear wheels a long way behind me. I even checked left and right mirrors and blind spot when moving off from the supermarket till with the trolley! The till staff still look at me oddly now! :smiley:

At every tight roundabout or junction I would watch how other truckers took the line and learnt from it.

Knowing that my test was to be Swynnerton, I downloaded the test routes from the links you provided. As all the routes are places I had always driven past rather than through, I spent two or three days driving round the suburbs of Stoke-on-Trent, and the towns of Stone and Stafford and the routes in and out of the Test Centre.

Having said all that, there is of course, a world of difference between reading something and thinking that you understand it — and putting it into practise - especially when things go wrong. Which for a newbie is often! :blush:

I did a one-hour assessment drive in early November (through the A34 Newcastle-under-Lyme ring road — what a learning curve!) But apart from mastering the four-over-four gearbox (Volvo FM 250) and general size and feel of the thing it brought out some key points. Many have been made already but there might be a few that haven’t:

  • I thought that my MSM was pretty good but 40 years of bad habits is hard to fix and I have been SM-M for years (signalling and doing a mirror check at the same time, then moving) and this still blights me in a crisis now.

  • I didn’t know it but I have always driven to the kerb (unless there are lane markings). After that drive (assessment) I suddenly realised what the white lines are for (especially the central white line) and subsequently drove the car to that rather than the kerbs. That helped a lot but needed further correction later as I became transfixed by them to the point that where they were narrow they pushed me onto the kerb, so I had to learn when to “pinch” or straddle the white lines to clear the kerbs.

  • When reversing a car or maybe a van, we look over the shoulder and through the rear window to get the general line-up and use the door mirrors to check for clearance. My advice to newbies is stop doing this in the car for preparation and just use your mirrors to find the gap and reverse into it. Where I live I choose to reverse into a narrow, open-fronted shed/garage and also an archway to turn around. Find the gap in your mirrors alone and do the whole thing without looking over your shoulder (and don’t blame me if you hit something).

  • Speed on Approach and Depth in Braking. This I think is the biggest step-change a car/van driver needs to understand and though Rog covers it well it can’t be stressed enough. It was the biggest single issue we both had. UNDERSTAND this newbies!! :exclamation:

I read this and took it in and tried to apply it in the car but didn’t realise what this really meant and why. I do now! And significantly my co-trainee suffered with this too perhaps more so than me.

Like most car drivers, we hammer up to a roundabout or junction braking hard and then do everything at once. Indicating, still braking, changing gear(s), steering, changing gears again and so-on. (And has been said on here about Reps before: while also eating a sandwich, talking on the mobile phone and checking this quarter’s sales figures at the same time). :unamused:

Once I had grasped that I needed to get plenty of depth (distance) and constant braking, for what initially seems far too slow early-on it changed my (dire) performance on roundabouts. Because if you get the speed right-down early on, you have then got loads of time to get your gear change in, assess the situation and plan your next move.

My instructor named me “The Juggler” and as a back-handed compliment said he couldn’t attempt to do what I (initially) did. Still braking, steering one-handed whilst trying to range change a gear-shift and indicate too! :blush:

Oh and when you are into the roundabout, just steer and don’t worry about a gear change. And if the rev counter is on the top of the green, leave it there and just steer (and mirrors of course). Then when you are clear and have indicated your exit, sort the gearbox out.

  • Roundabouts and Approach Lanes (1): I had read this and sort-of understood it but couldn’t apply it until I met our infamous roundabouts on the test routes. The Walton roundabout on the A34 near Stone springs to mind for those that know the area. There’s also one or two on the Newcastle ring road. Must be that Staffordshire is fond of planting shrubs and bushes on roundabout islands to block your view! But I soon learnt to look over the bushes for the roofs of cars and vans that are on the inside lane and therefore coming round our way. My instructor’s words still echo in my mind now: “We are either going or we’re not. Don’t dither. And if you are not 110% certain, don’t go”. And “Look for your blocker” (traffic coming around the roundabout into the road we are coming out of that blocks the stampede from the right).

  • Roundabouts (2): I would add something our instructor taught us that I found very useful. On approaching open roundabouts (wide with reasonable visibility of the approaches) look over the hedges/through the trees well into the road approaching from the right so we have a clue as to what we are likely to meet before we get there. This extended to looking over bridges or under/over road signs even on town roundabouts. It all gives you more time to make a decision. You still may get a surprise and have to stop but you are at least fighting better initial odds.

If it’s a closed junction (no visibility either way) assume we are stopping and go for 4 or 3 (depends on truck). A “lifting” gear as Rog says.

  • Narrow country “B” roads: Extending the “over the hedges” concept to looking over the hedges across the fields on approaches to bends or junctions to see “if there is anything big” heading our way. So we are at least prepared and even easing-off in anticipation so we don’t meet them at the worst part.

C Class Training — Lessons Learnt

2:1 versus 1:1 Training.

I know much has been said about the relative merits of each system. I wasn’t offered a choice and was happy with 2:1 for my C training. My C+E is 1:1 (again not out of a choice but I am happy to try it) so I will give you more feedback on that later.

For my C training we started each day at 9:00am and finished at about 4:00pm with maybe a 45-minute lunch break and sometimes a brew at about 10:30am for 15 minutes or so. So I guess we each drove for about two 90-minute sessions each and apart from the first/last 10 minutes each day (A500) we were on test routes all that time. On top of that I had a 1-hour car drive to and from the yard at the start and end of each day.

As is common, we both (trainees) felt knackered at the end of each day and would have doubted the wisdom (and effectivity) of doing any more hours.

I was generally more than happy to climb into the “high” seat on the bunk behind driver and instructor and just chill out — especially if I was having a bad-hair day. Sometimes I would watch my co-trainee closely, re-learn the routes and approaches and mentally “drive” myself. Other times I would just turn off and sometimes (with low sun-angles, the visors down and being tall, had my head touching the roof of the cab) I had no choice as I couldn’t see anything.

Selfishly, my moral was boosted by seeing my cab-mate make the same (and different) mistakes that I did and overall I welcomed the rest and liked the system.

In another example as we neared test day, our instructor produced a typed-up copy of the DL25C Test Report and got each of us to critique the other just on mirror checks for about 30 minutes each. We both dropped about 10 mirror checks of one form or another in that time. Good practise for both of us.

Length of Course

Although I did a C Assessment Drive (no charge) this was more for the instructor to see what I was like rather than to set the length of the course as this was fixed at 6 days plus the Test Day (7 in total). They have found that this suits them and gets results and I would be very, very doubtful about my chances of doing a 4-day plus test on the fifth that I have often seen discussed.

I logged about 18 hours of driving, not including the test and had about one hour’s driving on the day ahead of the test (I was on at 10:30am).

My C+E course is 3 days at 4.5 hours of 1:1 driving each day and the test on the fourth day. Initially I felt this too tight but after the C+E assessment drive I feel I know what I need to learn and think it is manageable. We shall see.

For the C course we started on a Friday and were told that this day was just to get used to the size of the vehicle, the gearbox and brakes. There was little or no test-grooming; just lots of driving, correction and points made where necessary. This was excellent for confidence and just getting into it. Then we had the weekend off to reflect.

Then the following Monday to Thursday was all test routes and technique with Friday a mock test for each of us apart from the drive (50 minutes) each way to the Test Centre area.

I failed my mock test with 2 Serious (a kerb (Steering) and Use of Speed) and 12 minors and my co-trainee also 2 Serious (very bad kerb and too close to cyclists) and 6 minors. :open_mouth: Had my test been on the Friday, I am convinced I would have failed, but I learnt so much from that experience.

The huge transition (that I haven’t seen covered on the forum) is when you go from where the instructor is calling the shots (lines to take on junctions, speed, gears) to leaving you to decide. And that’s where it all goes wrong and you realise that your confidence is based on having a co-pilot.

So we both left the yard on that Friday night with our tails down. On the following Monday I passed with 9 minors (more than I wanted and stupid mistakes) and my mate with 6 minors. Result!

Attention to Detail

Little things can make a difference. Being long-legged I had never felt particularly comfortable in the seat position. And it was only at about day 4 (when after a break I had the keys and was in the cab and our instructor was still outside the café (aka Portakabin) on the phone) I thought “I’m going to sort this bloody seat out”. So got onto the cab steps and looked at what the seat controls were saying and got the height, rake and seat-back right for me. What a difference!

And I am always one of these types who in any modern vehicle needs to get the heat and ventilation right. Our instructor learnt truck driving in the days when ventilation was the draught coming up from the gear column gaiter and badly-fitting doors and the heater wasn’t. So all week we were misting-up off-and-on and opening cab windows in all weathers. So after I had sorted the seat position I got the air vents and controls correct. And guess what? No windows opened (other than reversing) or misted-up windows!

Mirrors

As our instructor said “If you come back after a perfect drive and tell me you failed on mirrors, then don’t blame me”! And in fairness to him he more than got the message across. Both I and my fellow trainee have still got sore necks from mirror work (especially the n/s).

As one student told our instructor (having failed on mirrors) “But I am looking in my mirrors”. Yes, but not always at the right time as I found to my cost.

I picked up two Minors (not the under-21 type sadly) :wink: for Mirrors on Change of Direction — not looking as I turned (back-end swing on a tight right-hander and nearly produced a Nissan Micra cabriolet variant without the cabriolet! I had looked (many times) before I turned but not as I turned. :blush:

Daft Mistakes

We all have our particular faults and these were some of mine that I’ll add in case it helps others.

  • Park brake on hill/gradient starts. Both of us struggled to get a smooth lift-off without leaping forward or rolling back and it was because we were trying to use the parking brake like a cable-operated one on a car or van and find a point of balance between braking and clutch pressure. Our instructor put us right and told us to find the point where the clutch bites (rev counter dips a little and/or the cab tilts slightly) then throw the parking brake off. By that I mean unlatch it and just let it fly off on the spring rather than try to gently move it to the off position. That fixed my problems though I still tended to roll back an inch or two and got two Minors for this on the test.

  • Not tucking in tight enough to the left kerb on right-handers (especially if there is a wall there). This is because I am still not too sure where the front nearside of the cab is and fear I’m going to clout the wall. One Minor, Steering (clipped the centre double-white as a result).

  • Appropriate Use of Speed. On a fast stretch of dual carriageway (60mph speed limit) I was running at 50mph but didn’t notice the speed drop off on an up-hill stretch and by the time I had noticed (45mph) the examiner had too. Minor, Making Progress.

C+E Training

As we had both now passed, what we really wanted was a date for C+E training. Again a subject of previous debate on the forum but I had the view that the general consensus was to keep going as you are in “training mode”. Indeed, our instructor had recommended that we do this earlier in our training week.

Whether it was our test results (too many Minors?) or a combination of that and a genuine instructor capacity problem with the upcoming CPC re-training of their existing drivers I am not sure, but the advice was “Go and get some C experience”. That’s easier said than done though in the current climate. And I think that here is a case where established drivers and instructors within large companies, don’t know just how bad it is for driving jobs outside of their familiar surroundings.

My upgraded C license was in my letterbox on the Saturday following the test on the Monday (not bad considering DVLA quote 3 weeks), so with that I approached a local haulage firm with an in-house training department and booked a C+E assessment drive.

I was more than apprehensive as our C instructor had positioned C+E as something much, much harder, even to the suggestion that maybe sticking at a C job might be a good idea. Overall I was surprised and pleased at how much it built on what I already knew and though I may be wrong, I feel that the move form a car to C is a far more difficult task than C to C+E.

My new instructor explained that the very first thing we would do would be the reversing exercise in their own yard. They have the Test Centre pad replicated with the “A” and “B” cones, dock, barrier and yellow-and-black painted bay markings.

First off he asked me to reverse the rig (DAF 85 and tri-axle Curtainsider trailer) straight back the length of the yard and to keep it straight. I had read Rog’s tips on keeping the trailer straight (equal amounts of trailer in both mirrors), but also someone who said “turn the bottom of the wheel in the direction you want the trailer to go” and this worked for me. Having towed boats of various sizes often enough, I found this was easy. He also showed me the piece of silver tape on the trailer rear mudguard and I lined this up with the top of the kerb (there’s a kerb behind the barrier at the Test Centre). Perfect!

Then for the exercise proper. I drove forward and lined up the rig with the left “A” cone and “B” cone just as with the C test and used the kerb mirror on the n/s to position close to the left “A” cone. And then full right lock to get the bend in the trailer, straightening out until the unit o/s wheels are parallel to the yellow line about 18" in (to leave enough room to get the front o/s wheel around).

My instructor told me to look for the trailer legs in the n/s mirror and as soon as I saw them to put the left lock on to follow the trailer and get the bend off. And hey — there it is! The much sought-after and squashed “B” cone. Then it was just a matter of keeping it straight as I headed for the dock.

I learnt on the C exercise that it was better to keep the rear o/s of the truck about in the centre of the dock (or even a little more over) initially (rather than go straight for the right dock cone) to put a bit of a curve in the reward track. Then get closer to the right dock cone as you straighten up. Someone else (forum) also talked about getting a curve in it (like Beckham!) and it helped me.

So I applied the same logic to the trailer and it worked well. Nicely into the dock but just a tad over-done from straight and wanted to move the trailer back-end a touch to my left. Put only a quarter turn of lock on which did straighten the trailer but now I had learnt something else: I had lost the view down the offside of the trailer and thus my reversing mark on the mudguard. My instructor calls this the “control” side and having lost it I was now in trouble. Prompted by him I took a small shunt forward taking the unit over to the left-hand kerb (or yellow line) which straightened us up nicely and then straight back in to the mark. Out of the cab to check and 3" from the barrier. Result!

“Well that’s a pass and good for a first attempt”. I was pleased. What’s all the fuss about or is it Rog’s diagrams and instruction up-front that helped?

Out onto the roads for some “A” and “B” road driving, roundabouts and some tight junctions in town. I found the DAF gate on the gearbox difficult compared to the Volvo (the latter quite “notchy”) but the DAF was more gentle and I was too rough with it and getting the wrong gears.

Apart from that I was surprised at how familiar it felt of course other than the length and judging the lines and turning points on roundabouts and junctions. My instructor helped initially but then at a multiple-lane, extended roundabout with some cross-hatched single carriageway sections left me to judge myself. I took all the room I wanted (perhaps too much) but was pleased to get around without mishap.

So I start next week and at the moment it looks achievable. I’ll let you know how it goes.

Thanks for all the tips so far Rog (and others): it has made the whole journey so much easier. Forewarned is forearmed as they say!

(Hope this helps someone - you can tell by the lenght of it I have too much time on my hands!!)

Neil :smiley:
= = = = = = = = = = = = = = = = = = = = = = = = = = = = = = = =
TRAINING TIPS FEEDBACK: -
Are they… :question:

Q - Useful:
A - Very, very much so
Q - Accurate:
A - Yes indeed
Q - Too much of a personal view:
A - Not at all
Q - Missing anything that should be included:
A - Added above (my personal experience). But stress again Speed on Approach and Why
Q - Have I Included something that should not be there:
A - No
Q - Do they Cause any friction with other instructors when you go for training:
A - None

ADDED NOTE BY ROG :-
It is quite normal to have a dip in the learning curve when training.
Typically this comes on day 3 of a 5 day course when it seems you have ‘forgotten how to drive anything’
Do not be concerned as after a good nights sleep it all comes together the next day :smiley:

RETURN TO INDEX

There will be 5 or 6 questions asked on C test. Only 2 questions will be asked on CE test.
You can apply/relate most of these (to a certain degree) to your car.
- Identify where you would check the engine oil level and tell me how you would check that the engine has sufficient oil?
Identify dipstick / oil level indicator, describe check of oil level against the minimum/maximum markers.
- Identify where you would check the engine coolant level and tell me how you would check that the engine has the correct level?
Identify high/low level markings on header tank where fitted or radiator filler cap, and describe how to top up to correct level.
- Identify where the windscreen washer reservoir is and tell me how you would check the windscreen washer level?
Identify reservoir and explain how to check level.
- Tell me how you would check the condition of the windscreen & windows on this vehicle?
The windscreen and windows must be clean, clear and free from defects. No mascots or sticker that restrict view.
- Tell me how you would check the condition of the windscreen wipers on this vehicle?
Windscreen wipers must operate. Blades should be in good condition.
- Tell me how you would check your tyres to ensure that they are correctly inflated, have sufficient tread depth and that there general condition is safe to use on the road?
Follow manufacturer’s guide, using appropriate equipment, check and adjust pressures when tyres are cold. Must have a tread depth of at least 1mm (1.6 for cars) across ¾ of the breadth of the tread and in a continuous band around the entire circumference. There should be no cuts, damage or signs of cord visible at the sidewalls.
- Show me how you would check the wheel nuts are secure on this vehicle?
A visual check to identify any nuts that are obviously loose, and check that the wheel nut indicators (if fitted) are in alignment.
- Show me how you would check the condition of the mudguards on this vehicle?
As part of daily walk-round check ensure mudguards and spray suppression equipment are secure.
- Tell me how you would check the condition of the suspension on this vehicle?
As part of a daily walk-round check, suspension should be checked for any obvious signs of deterioration or damage.
- Show me how you would check that all doors including cargo doors are secure?
All doors must be closed and locking levers for cargo doors (hatch or boot on car) are set in the recommended secured position.
- Tell me how you would check the condition of the body is safe on this vehicle?
As part of a daily walk-round check, ensure the body is fully roadworthy and there are no significant defects. No loose panels or items, which could endanger other road users. All inspection panels must be secure.
- Tell me how you would check the condition of the reflectors on this vehicle?
Ensure that all reflectors are fitted, clean, and functional (not cracked or broken)
- Tell me the main safety factors involved in loading this vehicle?
The load should be evenly distributed throughout the length of the vehicle so as not to affect control while the vehicle is being driven. Any load must be carried so that it does not endanger other road users. It must be securely stowed within the size and weight limits for the vehicle. The load needs to be secure so that it cannot move or fall from the vehicle when cornering or braking.
- Show me how you would replace the tachograph disc on this vehicle?
Candidate to demonstrate how to insert tachograph disc.
- Show me what instrument checks you would make before and after starting the engine on this vehicle?
Check to make sure all gauges and warning systems are working. Ensure that all gauges are reading correctly and that warning lights / audible warning devices are extinguished before moving away.
__- Show me / explain how you would check that the power assisted steering is working?__If the steering becomes heavy the system may not be working properly. Before starting a journey two simple checks can be made. Gentle pressure on the steering wheel, maintained while the engine is started, should result in a slight but noticeable movement as the system begins to operate. Alternatively turning the steering wheel just after moving off will give an immediate indication that the power assistance is functioning.
- Show me how you would check for the correct air pressure on this vehicle?
Ensure gauges are reading the correct pressures for the vehicle and that all warning lights are extinguished and audible warning devices are not sounding.
- Show me how you would check for air leaks on this vehicle?
Charge the air tanks, Charge the air tanks, and consult gauges for drops in air pressure. Walk round vehicle listening for any obvious leaks.
- Show me how you would check the operation (specify horn, warning device for reversing) of the audible warning devices on this vehicle?
Demonstrate use of control.
- Show me how you would set the windscreen demister to clear the windows effectively
Set all relevant controls including; fan, temperature, air direction / source and heated screen to clear windscreen and windows. Engine does not have to be started for this demonstration.
- Show me how you would switch on the rear fog light(s) and explain when you would use it/them. (No need to exit vehicle)
Operate switch (turn on ignition and dipped headlights if necessary). Check warning light is on. Explain use.(no need to exit vehicle)
- Show me how you switch your headlight from dipped to main beam
Operate switch (with ignition or engine on if necessary), check with main beam warning light
- Show me how you would clean the windscreen using the windscreen washer and wipers
Operate control to wash and wipe windscreen (turn ignition on if necessary).
- Show me how you would check that the headlamps, sidelights & taillights are working?
Operate switch (turn on ignition if necessary), walk round vehicle.
- Show me how you would check that the direction indicators are working?
Applying the indicators or hazard warning switch and check functioning of all indicators.
- Tell me how you would check that the brake lights are working?
Operate brake pedal, ask someone to help or use a stick to hold the pedal down.
- Show me where the first aid equipment is kept on this vehicle?
Candidate to indicate equipment if carried. Where equipment is not present, candidates should be able to explain under what circumstances (i.e. vehicle types, loads carried) it must be provided.
- Tell me how you would operate the loading mechanism on this vehicle (vehicle specific i.e. Tail Lift)?
Candidates should be able to explain briefly the correct operation and safe working practice of specific machinery fitted to the vehicle, e.g. tail lift, kneeling bus. - if you have not got a tail lift then ask for another question.

POSSIBLE ADDITIONS
- Are you satisfied that your cab locking mechanism is secure?
- Show me where the fire extinguishers are on this vehicle?

VOSA video of a walk around vehicle check - External link.
An artic is used to demonstrate the checks and most is relevant to a rigid.

RETURN TO INDEX

To leave comments on this post please CLICK HERE which is a link to the original idea for this combined post.

============================================================
Here are a couple of fairly common 8-speed gearbox types, with pics and a deliberately non-technical introductory explanation.

This post is designed to remove the fears associated with driving with an 8-speed LGV gearbox for the first time.
With good tuition and some practice, you’ll find that it will quite quickly become as familiar as any other gearbox that you already know.
GOOD LUCK. :wink:

First up is: the “slap-over” gearbox:

I’d suggest that it’s best to think of these two lots of four gears as being arranged “side by side.”
In the picture, the “C” is for Crawler, which is a gear that is even lower than first.

Operation.
Neutral is much wider in a left and right sense than a normal gearbox. To save getting all those gears mixed-up, there’s a springy bit about half way across the neutral. To start off, make sure that the gearstick is in the left hand side of the gearbox, then use gears 1 - 4, which will get you to 15-20ish mph. After you’ve used 4th gear, go into neutral, then pull the gearstick to the right, overcoming the springy bit, whilst staying in neutral. Then you’ll hear a “clunk,” then you push the gearstick forwards into 5th and carry on as you’d expect.

When changing down through the gears, come down as far as 5th, then come back into neutral, then push the gearstick to the left, overcoming the springy bit, then use the left side of the gearbox beginning with 4th to continue slowing down.

When in neutral, the gearstick rests towards the springy bit.
In the 1 to 4 gear section it rests to the right.
In the 5 to 8 gear section it rests to the left.

Next up is the “four over four” gearbox.

I’d suggest that it’s best to think of these two lots of four gears as being arranged “four over four.”

Operation.
To start off, make sure that the switch on the front of the gearstick is down:

Use gears 1 - 4, all with the switch “down,” which takes you to 15-20ish mph.

Then, whilst in 4th gear move the switch to the up position like this:

Next, move the gearstick into neutral, you’ll then hear a “clunk,” which means that 1st gear has now become 5th gear, so carry on up to 8th as you’d expect. The “clunk” means that you’re now in the “top half” of the gearbox. Now you can see why the gear numbers on the top of the gearstick are not arranged like the “slap-over” gearbox.

When changing down through the gears, come down as far as 5th, then whilst in 5th, move the switch to the down position, then move the gearstick into neutral (wait a moment for the “clunk”) and you’ll find that you’ve “switched” into the “bottom half” of the gearbox. (8th has now become 4th etc.)

In practice, with this type of gearbox, you might be in 7th and need to stop the vehicle. That’s fine, just stop and apply the handbrake. Then move the gearstick switch to the down position before going into neutral, then you’ll be in the right “range” to start off again. Experienced drivers sometimes forget to do this- myself included :blush: Tip: don’t change the range and go for a gear too fast, because you might miss the gear altogether due to some range changers being slower than others. :wink:

Another method of changing the gears working up or down the gearbox is called the ‘skip,’ or ‘block’ change. This can be accomplished using either type of range-change gearbox and the DSA examiners will be looking for test candidates to use this method where safe and appropriate to road conditions. One example of ‘skip’ or ‘block’ changing would be to set off in second gear, and changing from second straight to fourth gear ‘skipping’ third gear. Clearly, this wouldn’t always be possible if an up-hill start is required. However, where a downhill start is required, you will be expected to use ‘skip’ changing, dut to it being appropriate to do so.

============================================================

From an Instructors viewpoint…

Without doubt introducing the upgraded vehicle requirements for driving tests has made it harder to pass the test.

Of course some individuals can handle a range change with only a few wise words and never make it look hard work. However, most other people can take 2 or 3 days to get used to it.
This all costs money and generally there are now far less short courses than there used to be.
The pass rate hasn’t changed much but its more expensive now.

Common mistakes/failures include:

Forgetting to select low range when setting off and thus trying to move away in either 7th or 8th and possibly holding up traffic.
Whenever you stop choose low range when you move the lever to neutral.

Completely getting in a muddle at seemingly random times, usually by forgetting where any gears are and what gear is required.
This can happen because something has leaped out the tarmac and put off the poor novice.

Hopefully before the test, new drivers get out of this annoying habit, but the stress of the test can let it rear its ugly head again!

Trying to use all the gears to slow down is not seen as the modern technique, failing to come down the gears 8-6-5-4 or similar may cause test minors or a serious.
Gears are for going and brakes (not gears) are for slowing!

Don’t bother trying to change to 5th gear on a small roundabout unless your very good as you will find yourself trying to steer with one hand on the wheel.

Setting off in high range on the hill start up or down exercise is another favourite trainee error.

There are other hints and tips with this type of gearbox, but I’m leaving these to your instructor to avoid any possible confusion.
They’d be difficult and lengthy to write anyway. :wink:
It is also worth mentioning that this post is designed to address the driving of an unladen LGV under tuition/driving test conditions.

We hope this is helpful and calms any initial fears you might have.

Post acknowledgements for contributed material go to dieseldave, Tockwith Training, Krankee & ROG.

RETURN TO INDEX

An instructors explanation for the 4 over 4 gearbox…

Imagine a capital H directly on the top of, and covering another capital H with a switch on the gearstick that allows you to change from one level to another.

The gears 1 to 4 are on the lower H and gears 5 to 8 are on the upper H. Gear 1 & 5 are the same slot as are 2 & 6, 3 & 7 and 4 & 8.

Depending on circumstances, it is not always necessary to do the following as ‘block’ or ‘skip’ changing (Missing out) gears can be done.

To work through the box from 1 to 8 and 8 to 1 is as follows: -

Set switch on gearstick to low range, gear 1 is top left as you look at the H, gear 2 is bottom left, gear 3 top right, gear 4 bottom right — go through the gears just as you do for your car, gear 1, 2, 3, 4. Now it gets interesting! — Whilst still in gear 4, move switch on gearstick to high range THEN into neutral and place in the gear 1 slot that is now gear 5. Now straight back to 6 (old 2), top right is 7 (old 3) and straight back to bottom right for 8 (old 4).
Now down the gears (remembering to slow down/brake to a speed that the next gear will engage in) — 8 to 7 to 6 to 5 — range switch to low THEN neutral and into the 4 slot then 3, 2, 1.

On the down changes it will help you a lot if your foot is on the accelerator and not the brake when changing the gear as it gives you the option of “blipping the throttle” to match transmission speed with road speed if you are going a bit too fast for the gear to comfortably engage. It is also known as the “racing driver gear change” for when they want to keep high revs when going into a lower gear.

If you are having problems when changing the range from say, gear 3 to 5 or 5 to 3, then remember, you can flick the switch in readiness as it will not change the range until you put it in neutral.

An example using an empty truck from a static start and block changing up: -
Starting in neutral - Switch down - now in low, into 2nd, move off, keeping switch down select 4th and immediately put switch up - the range will not change, it is still in low - now change into 6th without touching the range switch as it is already set to go into high the moment you pass through neutral.

If the problems are due to rushing the gear change then ‘SAY HELLO’ to neutral :exclamation: - gear 7 to 5 - take out of 7. “HELLO NEUTRAL”, into 5

The main problem with these gearboxes is NERVES - especially with males as the nerves make the arm muscles tighten and they end up forcing the gearstick through the reverse gate and trying to get crawler or reverse instead of 5th etc. This is shown by the number of minors in the gears section of the examiners sheet and if it gets to 4 then a serious is marked and is therefore a fail.

Another nerves prob is to move the range switch when changing to other gears in the same range and they are therefore now trying to get an innapropriate gear in the wrong range.

Think through each gear change, dont rush it and dont get nerves - job done!

bestbooties:
A range change is a case of going through the main gearbox twice,once in low range,then into high range,which can be switch,slap over,or collar type.
The switch or collar type is USUALLY down for low box and up for high box.
Starting off in the low box,which gear depends on whether you are loaded or not,(experience will tell you).Change as normal up to 4th gear,lift the switch or collar into high just before the next change,(the change will not take place until you go through neutral),then change from 4th low UP to first high and continue to 4th high.Changing down is exactly the reverse operation.
On the slap over type,when you “slap over” the gear lever to the left,the lever will then rest in the 3rd and 4th position.therefore you will need to push the lever over against the spring to get 1st and second as you would do on most cars.When you have changed up to 4th,to get into 5th,go to change up as you would normally,push the lever into neutral,then “slap” it over towards you,let it centre,then straight forward again and you are in 5th gear. Straight back for 6th,then forward into neutral then towards you against the spring and forward into 7th.Straight back into 8th.Changing down is the reverse sequence.
On the “Slapover"type,reverse is usually on the “Low” side,so slapping over to reverse it’s automatically in low so it’s not possible to be in"High reverse”,whereas some swith or collar type,unless they have an interlock,it may be possible to engage reverse when in high range.
On the “Splitter” type’box,However many gears are in the main 'box,you only have to go through once,but every gear is “split” or halved as you change.
The "Splitter"switch is also normally down for “Low” and up for “High”.
You would start off in whichever gear is required,depending on load and conditions,usually in “Low split”.If you wish to “Split up”,move the selector switch to “High”.Nothing will happen until you disengage the clutch.simply use the clutch to change up to “High split” .To do a “Split change”,if you are in for example 3rd gear "High"and you wish to go up to 4th “Low”,depress your switch into the “Low” position,then change up to the next gear,the “Splitter” will change down to “Low” as you go through neutral,because in effect you are only going up half a gear,it can be a quicker change.You may not need to split every gear,if you are empty or the going is easy,you may only need to use the “Splitter” on the top few gears.
Again,unless there is an inhibitor,it is possible to engage “High” reverse.
A “Range change” plus “Splitter” gearbox is a combination of the two and can take a little more time to get used to.
But hey,you will only be learning on one type at a time.It is not possible to teach someone to drive or overcome the percieved complexities of a modern transmission on a thread like this.
Half an hour on a straight piece of road should be enough to master the basics of the average modern gearbox.


Krankee:
You may have heard the terms “Splitters” and “Range Changers” but do you know what they mean and how to make best use of these features?
A “Splitter” is a feature that provides both a high and a low ratio in EVERY gear. A switch or air valve mounted on the gear lever operates it. The operation of the splitter can be pre-selected and when a ratio change is required, the simple action of dipping the clutch will enable the feature to function. Whereas a typical gear change will vary the rev counter needle the full arc of the green segment, the operation of the splitter will result in a rev change of half of that segment. Hence, it is often referred to as “Half a gear”, and effectively doubles the number of gear options available to a driver.
Any vehicle, when travelling on a flat road, will lose speed when the clutch is disengaged. This is caused by a number of factors, which include wind resistance, friction between moving parts, and the rolling resistance of the tyres. Speed losses are more pronounced for a laden truck on an uphill gradient.
A splitter gives the driver the option of compensating for these speed losses and thereby enables him to maintain the revs of the engine within the band that provides for both best fuel efficiency and maximum power output, whilst minimising strain and wear on the drive train.
Typical usage of the splitter would entail starting off in 2nd low, moving the switch to pre-select 2nd high, then dipping the clutch when the rev counter reaches the top of the green segment, thereby engaging 2nd high.
As the road speed increases, the driver then moves the switch to the low position, and when the next gear change is required, the action of depressing the clutch whilst moving the gear into 3rd, will result enable the splitter to operate and 3rd low will be selected.
The driver then repeats the sequence as the road speed continues to increase.
Conversely, on a downhill gradient, where the weight of the vehicle will cause it to gain speed, and a full gear change will quickly bring the rev counter back to the top of the green arc, the driver may choose to change a “Gear and a half”.
The sequence for this, for example, would be to start off in 3rd low, move the switch to the high position, and by changing into 4th gear, 4th high would be engaged. Then moving the switch back to the low position would afford a ‘skip’ change directly to 6th low.
Equally, the splitter can similarly be used when speed is lost on an uphill gradient and it becomes necessary to select a lower gear to maintain the power output within the most efficient rev band. In this situation the splitter is best used only on gradients of 5% or less as on anything greater than 5%, the loss speed of the vehicle whilst the clutch is depressed, will in all probability, equate to a full gear change.
RANGE CHANGERS
A “Range Changer” is simply an ‘engineered’ method of providing the driver easy access to the full range of gears fitted to the vehicle. Just imagine trying to correctly select any of eight gears that were formatted in a typical car type layout.
The Range Changer enables manufacturers to provide the driver with a gear lever that has a typical four speed H configuration and a switch to determine whether gears 1-4 or 5-8, are to be selected. Like the splitter, the Range Changer can be pre-selected, but is only activated when the gear lever passes through the neutral position.
Range Changers are commonly categorised as “4 over 4”
or “Double H”
where moving the gear lever sideways across a spring loaded pawl determines selection of high or low range.

‘Skip’ changes can be accomplished with either layout.
Many modern vehicles are fitted with
both a “Splitter” AND a “Range Changer”.

An instructors explanation…

Depending on circumstances, it is not always necessary to do the following as ‘block’ or ‘skip’ changing (Missing out) gears can be done.

Going up and down ALL the 16 gears - this might get boring :unamused:

Starting in 1st with splitter switch set to low = 1st low
splitter switch up and dip clutch = 1st high
splitter switch down and put into 2nd = 2nd low
splitter swich up and dip clutch = 2nd high
splitter switch down and put into 3rd = 3rd low
splitter swich up and dip clutch = 3rd high
splitter switch down and put into 4th = 4th low
splitter swich up and dip clutch = 4th high
NOW THE FUN BIT…
spltter switch down, range change switch up (or if ‘slapbox’ - slap right) and into 5th gear = 5th low
splitter swich up and dip clutch = 5th high
splitter switch down and put into 6th = 6th low
splitter swich up and dip clutch = 6th high
splitter switch down and put into 7th = 7th low
splitter swich up and dip clutch = 7th high
splitter switch down and put into 8th = 8th low
splitter swich up and dip clutch = 8th high

And now, coming down the gears starting in 8th high
splitter switch down and dip clutch = 8th low
splitter swich up and put into 7th = 7th high
splitter switch down and dip clutch = 7th low
splitter swich up and put into 6th = 6th high
splitter switch down and dip clutch = 6th low
splitter swich up and put into 5th = 5th high
splitter switch down and dip clutch = 5th low
NOW THE FUN BIT AGAIN :slight_smile:
splitter switch up and range change switch down (or if ‘slapbox’ - slap left) and into gear 4 = 4th high
splitter switch down and dip clutch = 4th low
splitter swich up and put into 3rd = 3rd high
splitter switch down and dip clutch = 3rd low
splitter swich up and put into 2nd = 2nd high
splitter switch down and dip clutch = 2nd low
splitter swich up and put into 1st = 1st high
splitter switch down and dip clutch = 1st low


From an Instructors viewpoint…

Tockwith Training:
Without doubt introducing the upgraded vehicle requirements for driving tests has made it harder to pass the test.
Our company held on to two rusty old trucks for a few years when we really wished we could have used the newer (range change) trucks often sat in the yard doing nothing but these old ones had ‘car like’ gearboxes and thus easier to drive for novices and had a better pass rate with hard to teach drivers!
Of course some individuals can handle a range change with only a few wise words and never make it look hard work. However most other people can take 2 or 3 days to get used to it, this all costs money and we now do far less 4 day courses than we used to. So Our pass rate hasn’t changed much but its more expensive now.
Common mistakes/failures include:
Forgetting to select low range when setting off and thus trying to move away in either 7th or 8th and possibly holding up traffic. Whenever you stop choose low range when you move the lever to neutral.
Completely getting in a muddle at seemingly random times, forgetting where any gears are and what gear is required. Usually because something has leaped out the tarmac and put off the poor novice. Hopefully before the test new drivers get out of this annoying habit but the stress of the test can let it rear its ugly head again!
The gear change exercise is harder with an 8 speed, drivers may choose the wrong gear coming down the box - like 3rd instead of 1st or resume normal driving in high range by mistake. The straight 6 was easier but you could still get the wrong gear and 1st was possibly harder to find because the ratio difference between 2nd 1st was larger. On an 8 speed the difference between gears is less which makes having the correct road speed and engine rpm less of an issue (gears go in easier).
Trying to use all the gears to slow down is not seen as the modern technique, failing to come down the gears 8-6-5-4 or similar may cause test minors or a serious. Gears are for going and brakes (not gears) are for slowing! Not my opinion - the DSA’s.
Don’t bother trying to change to 5th gear on a small roundabout unless your very good, you will find yourself trying to steer with one hand on the wheel.
Setting off in high range on the hill start up or down exercise is another favourite.
I dare say I could go on.
Myself, when I learnt I just got told its a 4 over 4 gearbox here is the switch, off you go fella! I soon learnt.
Oh, and I’m not a fan of the slap over gearbox found on Renault and recycled U-Boats (mercs), they are simple but why should you do 3 lever movements instead of 2. Check out what your driving school can offer.
Example - changing from high 5 to low 4th:
Slap over -
1. Move lever to neutral
2. Slap lever to the left and let centralise
3. Pull lever back for 4th gear.
Range Change -
1. Flick switch as you put lever in neutral
2. Select 4th gear (right and back)
_________________
DSA Registered Instructor
RTITB Accredited Instructor


Now a few other bits that may be of use to you…

macplaxton:
3 over 3 range change with splitter [/b]

The layout:

The range change aluminium collar: -

Shown in low range

slid up to high range

Splitter switch in low

Splitter switch in high

Lower black collar allows lever to fold:

RETURN TO INDEX

This is a very simple explanation for the two types of DRIVER CPC.

There are TWO types of DRIVER CPC.

The INITIAL (to get a C1 or C licence) & the PERIODIC (ongoing) for when you have the C1, C or C+E licence

The INITIAL driver cpc is purely for a C1 or C licence acquisition and is about the same as what is done now but with some senario questions added as an extra theory test and a half hour extra of questions about certain areas of safety which may include physically showing the examiner how to strap, chain, rope a load etc

The PERIODIC driver cpc is to be (unless they change it) an ATTENDANCE of 35 hours of training at an approved centre or with an approved trainer. It needs renewing every 5 years and can be done in 5 x 7 hour sessions, which can be spread over the 5 year period.
The 7 hour sessions can be split into 2 half consecutive days.( 2 x 3.5 hours)

If you have a C1, C or C+E licence on 10 Sept 2009 then the 35 hours will need to be done by 10 Sept 2014 to retain your right to drive LGVs COMMERCIALLY (getting paid to drive LGVs for a living).
Please note: - This does NOT affect your right to retain your LGV licence.

Those that pass the INITIAL driver cpc after Sept 10 2009 will have to do their PERIODIC driver cpc within 5 years from their pass date - the 5 year expiry date should be on the issued DRIVER CPC QUALIFICATION CARD (DQC).

The medical requirements will not change.

The upgrading to a C+E licence will not change from what it is now.

Those who have grandfather rights for the driver cpc and have never been issued with a DQC now have the choice of either doing the initial or periodic to gain the first 5 years

I Hope that I have managed to make things a little clearer.

The DRIVER CPC is not the same as other CPCs

RETURN TO INDEX

LGV C TEST REVERSE VIDEO

CONTROLLED STOP

The controlled stop is no longer a part of the test.

RETURN TO INDEX

TIPS FOR THE DVSA C+E (ARTIC)
These are my personal tips - your instructor may do things slightly differently.

The artic trailer ‘PIVOT POINT’ is the front axle of a tandem trailer and the middle axle of a tri-axle trailer.
The o/s/f unit wheel controls the n/s trailer pivot point & the n/s/f unit wheel controls the o/s trailer pivot point.
The more room you take with the unit front wheel will mean the more room the corresponding pivot point will have.
Take some time out and go to a place where artics do regular turns and watch them.

Watch out for where the road ‘kicks’ left just before a roundabout as that is a point where you can get caught out with the n/s trailer wheels. Look at the ground near such a place and look for the ruts in the grass etc where others have got it wrong.

Work out what piece of road you need to avoid going over a kerb and stick to your plan. If some else takes the space you need then BRAKE and wait for the space to become clear for you to use.

If, when looking at a roundabout, you think you will need all the room when on the roundabout, then take all the room on the approach.
Check that left mirror just before entering a roundabout or turning left — the examiners are hot on that one.
If unsure what gear to use for a roundabout or turn, try gear 4 if still moving — the highest gear of the low range — most will go up to 20mph which, in most cases, is quite quick enough on test for a small to average roundabout or a 90 degree turn.

On an angle start, get that last possible look in the left mirror before you lose the view as the unit will angle to the right and the trailer will then block the view.

The vidoes below will give you an insight to the positioning of an artic when negotiating hazards.
The camera is set about 1 foot right of the windscreen centre.
Notice how the driver makes use of the available road space including the cross-hatchings.

euroscot
FROM HERE
:
http://www.youtube.com/watch?v=dShfpXXJ3bo

http://www.youtube.com/watch?v=xbhEfCbAVdg

http://www.youtube.com/watch?v=2ZtIIRtcScw

ARTIC or W&D :question: :question:

taximan:
If you take your test in a rigid pulling a trailer, does it give you full C+E entitlement with no restrictions? For example, after passing in said combination, would someone be able to jump into an artic legally.

YES - BUT consider this…
Your first job is likely to be on artics and they are different :exclamation:
Why put yourself through the extra stress and pressure on your first day in a new job :question: :question:
A lot of training companies use W&Ds because it is a cheaper option than buying a proper artic.

My advice - LEARN IN THE TYPE OF VEHICLE THAT YOU WILL BE DRIVING.

Stuie:
I applied for a transfer in Feb. when I passed my C and heard nothing so I took the C+E in July. Yesterday I got a phone call, for an assessment drive and interview for today.
Interview was ok. now out for a drive in an artic (I did my test in a waggon and drag) what a difference. Driving forwards was fine. Just took bends a bit wider and kept out a bit more on roundabouts watching the rear wheels.
The gear box was not good to say the least it was a 4 over 4 with another button for half gears.It was so stiff I had trouble getting 5 and 6 it was a real heav ho.
Now the reverse, in the w/d I eventually did ok I knew how to control it. The artic no hope the instructor helped and we eventually got into the bay( no one and a half vehicle witdth) it was about 3" off the tyres so tight.
So I thought I had blown it.
Then I got a phone call saying I have the job. They said the main drive was ok and they will teach me how to reverse.
So pleased!!!.
As a conclusion waggon and drag are so different to an artic. I wish I had trained in an artic.It was a real wake up call.

tyler4164:
Hi mate, i passed my class 1 with a wagon & drag & got a class 1 job straight away. I’ll tell you the same thing i tell everyone, going from a wagon & drag setup straight into an artic is completely different. I had to retrain myself to reverse etc as its completely different. My instructor used both artics & wagon & drag. I told them i wanted to learn in artic & i was talked out of it by instructor. Said i should pass easy way then learn to drive artic while being paid. Should never of listened!!! Use an artic mate…trust me!!!

RETURN TO INDEX

C+E W&D TEST REVERSE VIDEO

C+E ARTIC TEST REVERSE VIDEO
video sound quality poor but you’ll certainly get the idea :smiley:

The following video is excellent for showing the view from a mirror and the o/s front wheel not crossing the line at the start of the ARTIC reverse, HOWEVER, both mirrors will need to be used constantly on training and the DSA LGV test.


This is one way of instructing trainees on the ARTIC reverse other instructors may have different methods
Vehicle is Volvo ‘V’ reg. F12 380 sleeper cab with 45-foot tandem trailer with super singles.
Total length is 16.5 metres, the maximum allowed for the DSA LGV test.

On approaching the marked out reverse area, I get the trainee to drive over the marked garage box and put the n/s/f unit wheel 2 feet from the right of the left boundary line and keep it that distance away until we are nearly level with the start cones. I tell them not to look at the trailer because that will take care of itself and to concentrate on keeping the two feet distance with the n/s/f unit wheel. We then stop and everything is in a straight line.
I then explain the straight-line reverse and how to make the trailer move slightly to the left or right.
Straight line reverse — if the trailer starts to go into one of the mirrors then turn the wheel into that mirror until both mirrors are seeing the same amount of trailer again, then keep the mirrors seeing the same amount each.
To make the trailer go to the left or right — slightly pull the wheel the opposite way to what you want the trailer to go which will put a little more trailer in the mirror on the side you want it to go and hold that little amount for a few seconds by slight adjustments to the wheel.
To stop the bending and to find out exactly where you now are, turn the wheel into the mirror that has the trailer in it until both mirrors see the same amount of trailer.
The bending of the trailer will not stop until both mirrors are seeing the same amount of trailer.
This straight line reversing and the slight moving to adjust position of the trailer gives the trainees the basic information.

Next is the setting up for the start cones along with the initial unit manoeuvre to put the bend in the trailer.
Setting up for the start cones is exactly the same as the rigid C test but the DSA have the B cone and the start cones about one pace further out to the left of the yellow line so you have more room. Keep as far to the left in the start up area as you can without going out of the area as this will give you more space to manoeuvre on the right — you should be able to see the B cone in the left mirror and not have any part of the lorry through the start ‘A’ cones in front of you.

Seatbelt does not have to be worn to do the reverse manoeuvre.

Initial unit manoeuvre to put the bend in the trailer.
Open driver window, into reverse gear, check both mirrors and do an out the window blind spot check.
No dry steering. As you start to move back put a full right lock on and when the unit gets to about 45 degrees, centralise the steering — the rear wheels of the unit want to be about 18 inches from the yellow line with the front unit wheels the same as the back so that the unit is now parallel to the yellow line and about 18 inches from it. Think of it like manoeuvring a small rigid and whilst doing this bit, forget about the trailer.
With the set up of the artic I use, I ask the trainees if the normal n/s mirror is full up with the trailer. If no, then staying in the parallel position, keep reversing back until it is.
When the trailer has just filled up the mirror put the o/s/f unit wheel next to the yellow line and hold it there until the mirrors are showing the same amount of trailer in each.
You now have the unit & trailer in a straight line, with the whole set up at an angle, but not always exactly the same angle, across the reverse area with the rear end pointing in the general direction of the garage cones.

Now the info given at the start comes into play.
The objective is to get the whole combination over to the far left edge of the test area and end up with it in a straight line before entering the garage cones. This is the tricky bit!!
Using BOTH mirrors and, if you want to, looking out of the driver’s window, gently turn the steering wheel so that the trailer appears more in the right mirror than the left. Hold that amount in the mirror or it will keep on increasing the amount of bend. At this point you may require more or less bend in the trailer so adjust the wheel as necessary. Put the unit into an exact line with the trailer every so often and then THINK what you need to do next BEFORE you do it.
The bending of the trailer will not stop until both mirrors are seeing the same amount of trailer — this is the only way you will know exactly where you are.
As the trailer gets near to the first garage cones decide at this point whether you are going to easily get into the garage or whether to take the option of a forward shunt (you are allowed two). If shunt forward then do as stated at the start of this post — unit wheel two feet from left edge of area and hold it etc.
If the combination will easily go into the garage then that is a BONUS point to you — never hold back from doing a forward shunt and then doing a straight line reverse — the passing of this test is paramount.
The vehicle I use has a mark on one of the rear wheel arches and when this mark seems to touch a certain point on the floor area just before the barrier it is time to stop. The trainee is allowed once only, without any marks against them, to get out of the cab and go to the rear of the trailer to see where it is positioned and may then get back into the cab and adjust for the final time if needed. The rearmost part of the trailer should stop over the yellow & black-hatched area just prior to the barrier. Don’t hit the barrier, as it is an instant fail.

You may have noticed that at no time did I TELL the trainee which way to turn the wheel. I gave the trainee the information needed and let the trainee decide.
Other instructors may have different methods but I have had a roaring success with this one. :smiley: :smiley: :smiley:

darkseeker:
just a quick tip for your reversing mate (it took me ages to realise this):

you get the trailer out of the starting area and passing the cone then swing the unit around the kingpin so as to get the whole lot straight (ish) Now, when I first started, I thought I needed to get the trailer’s wheels over the far side of the area then swing the front of the trailer arround (pivoting on the wheels and pushing with the unit) but that doesn’t work well, not for me anyway.

How I found worked;

You’ll’ve done your rigid test, iirc what I’m about to say is similar;

in a rigid, you head across the area at an angle (or a slight curve) and aim the offside rear wheel to go around the first cone on the garage… hold that thought!

ok, you’ve got the trailer out of the starting bit and you’re getting the unit straight with the trailer, keep half an eye on the steering wheel, and watch what the unit’s doing in relation to the trailer - the two will come straight (you’ll probably be turning the steering wheel at this point) they’re straight, you’re moving back slowly, the steering wheel’s straight NOW before you go back more than a couple of feet. turn the wheel a little bit past straight (to the left) only quater of a turn or so) and take the whole lot towards the garage in a long curve, adjusting as you go so the offside wheel of the trailer misses that first cone by a few inches and goes round it in a curve, you’ll need to turn left a bit more now to start shoving the front of the trailer over to the other side of the area but GENTLY - if you get the unit at much of an angle to the trailer at this point you’ll find it difficult to correct and you’ll probably over-cook it.

Hope that makes sense, what I’m trying to say is you can’t get the trailer over the other side of the area then push the front of it round with the unit, you’re trying to do too much in the space allowed, you need that bit of a curveas you go across, it does most of the job as you go. Saying that, I’m no expert - just don’t forget once you’re out of the starting area, you don’t need to move the steering wheel very far at a time. turn the steering wheel a little bit and give the trailer time to react, it doesn’t straight away

my 2p, best of luck mate.

Giblsa:
so once youre past/not going to hit the marker in the middle you just seem to ‘curve’ it in to the box (like beckham) then straighten up as the wheels reach the cones and do it all very slowly with slight turns!

RETURN TO INDEX

This post is designed to be an introduction to the coupling exercise and is written in a deliberately non-technical way. It relates to C+E artics.
I’m aiming at giving you a head-start with terminology and some pics of the items.
There’s no attempt at describing the exact procedure, because ROG has covered that in the next post below this. :smiley:

(It’s a l…o…n…g post, so grab a butty and you’ll need to scroll… :wink: )

The tractor unit in the pics is an “S” registered Volvo FL10 as used by many LGV training schools.

The pic below is of a fairly common type of fifth-wheel known as a “slider.”
The non-sliding type wouldn’t have the shorter of the two handles, because that kind of fifth-wheel is “fixed.”
I’m not covering the sliding of it, because it might cause confusion.
The one thing I’ll say about sliding these is that it should only be carried out by an “old hand,” because if you get it wrong, the potential damage could be very expensive to put right.

PIC 1

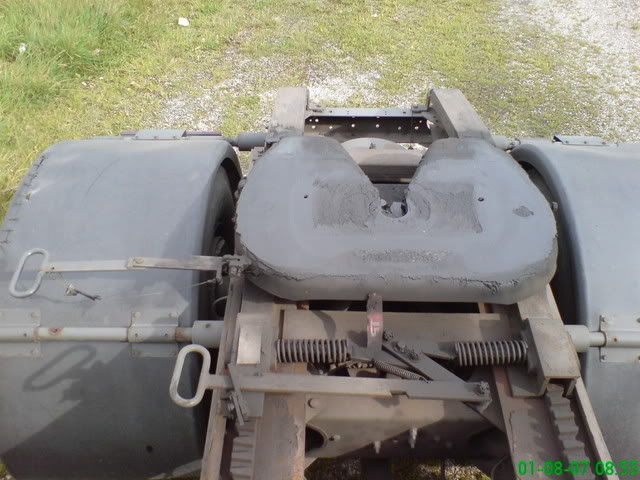
The big greasy plate is the “fifth-wheel” (this one needs more grease!!) The fifth-wheel supports the weight of the front end of the trailer and has a locking mechanism for grabbing the trailer’s “king-pin” just visible at the bottom of the “V” shaped notch in the above pic. To uncouple the trailer you stand on the driver’s side of the truck and, after removing the safety-clip, pull the longer of the two handles towards you. After the landing legs have been lowered, the action of pulling out the handle about 2’ (like in the pic) “opens” the coupling and you can then drop-off the trailer.

PIC 2

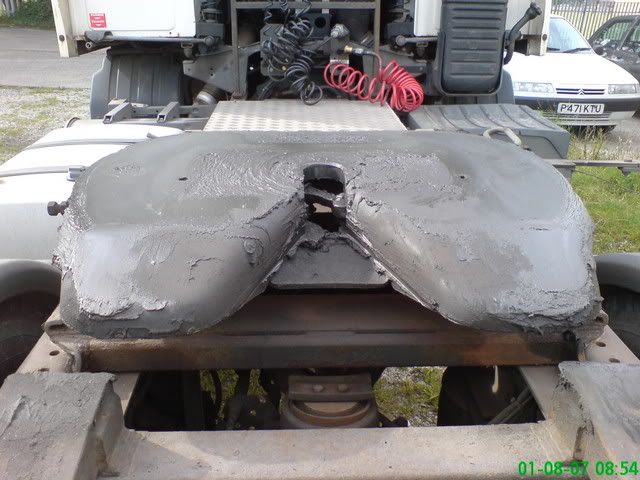
You can see the locking mechanism much more clearly in this pic.

The locking mechanism grabs the trailer’s “king-pin.”
The king-pin is in the centre of the pic below.
PIC 3

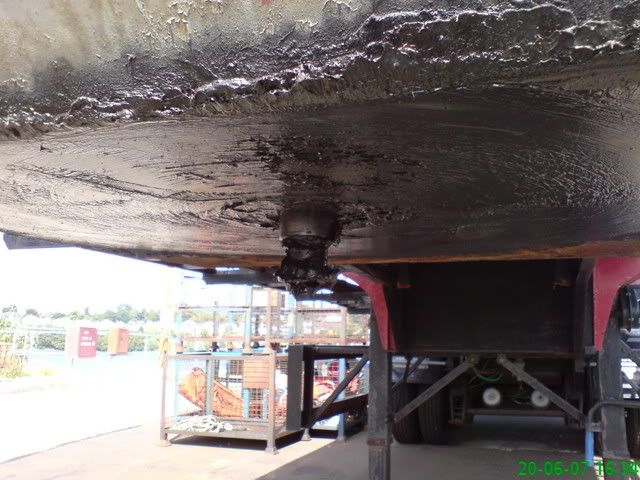
It’s very important to make sure that the heights of the fifth-wheel and kingpin are correct, because if the trailer was dropped-off by a higher tractor unit you’d miss the pin completely and smash the back of your cab with the front of the trailer. (It has been known to happen… :wink: ) When you’ve checked the heights (from outside the cab,) you reverse gently under the trailer until you hear a clunk. You then do a couple of “test-pulls” to make sure that you have “grabbed” the king-pin correctly. If you look at it again from outside the cab, you’ll notice that the lock release handle (the longer of the two in the first pic,) is now much shorter, because the coupling has closed AND locked. That’s what makes the (loud) clunk noise. We can say that the closing and locking of the coupling is automatic, once you’ve reversed far enough.

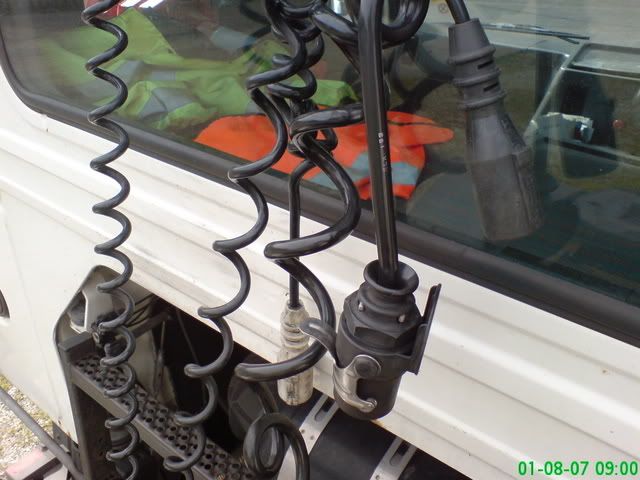
That just leaves the air and electrical “susies” so here’s a few pics of those.
They don’t need much explanation, because they have different ends/connectors, so you can’t really make any mistakes with these.
I’ll just stick with what we call them.
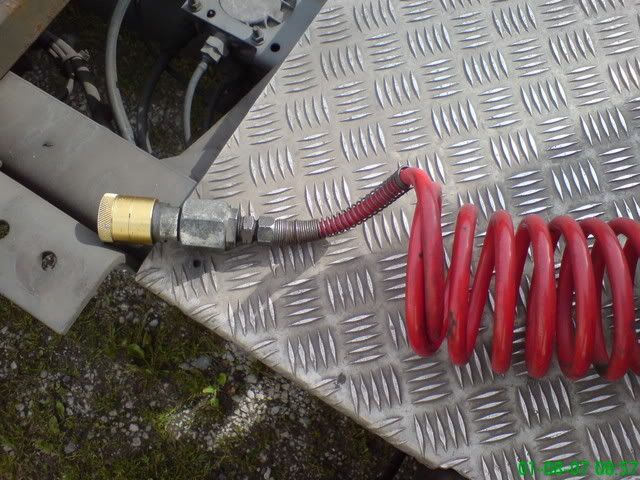
PIC 4
Red air line.

PIC 5
Yellow air line.

PIC 6
3 x Electric “susies” (Various sized/coloured ends with different connectors.)

Your instructor will give you as much detail and explanations as you you’ll need for your test.
I avoided trying to describe the exact procedure so as to leave you with a head start rather than a spinning head.
I hope there’s a bit less mystery to the words we use and what the things look like. Like my post about the gearboxes, could you please leave a bit of feedback so I know whether I’ve got this right- CHEERS.
I hope you find it helpful. :wink:
GOOD LUCK with the driving tests.!!!

Full credits to dieseldave for the above.
===================================================================================

ARTIC UN/COUPLE PROCEDURE for the DSA test.

NOTE: The coupling/uncoupling procedure is 33 seconds into the video.

There are a few more un/couple videos on youtube = m.youtube.com/watch?v=TeVzwQ4o1B0

Included are references to the pics in Dieseldave’s post above :smiley:
The usual time to do this is after the road drive and on the reversing area — the examiner will inform you where to park and you will stop in a straight line. A lot [of test candidates] ask the examiner if whether they have passed at this point because they feel that doing the un-couple & couple-up procedure is just wasting time if they have already failed — this is acceptable to the examiner.
Not every instructor teaches this exactly the same way but there will not be much difference. For ease, I have divided this into three stages. 1, the uncouple, 2, the trailer check and 3, the couple up. I always get my trainees to do a complete circuit of the lorry.

Stage one — the uncouple.
Switch off engine and exit cab with the keys and some gloves.
The word is B.L.A.C.K.
B = brake
L = legs
A = airlines (and electrics)
C = clip
K = kingpin (coupling locking device)

Mothertrucker:
Good one - although I always use BLANK
Brake
Legs
Airlines
Number plate
Kingpin (which includes clip)

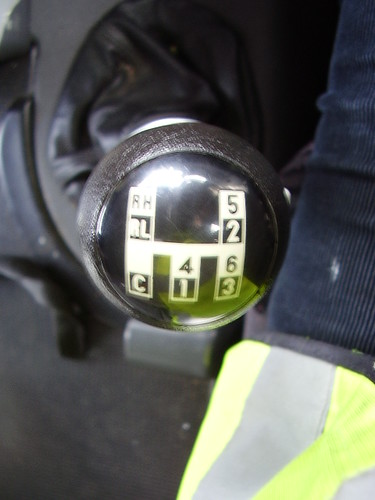
Apply trailer (B)rake. There are usually two pull devices and only one is the brake — the other is the shunt. Your instructor will show you, which is which as not all are set up the same or located in the same place on each trailer.
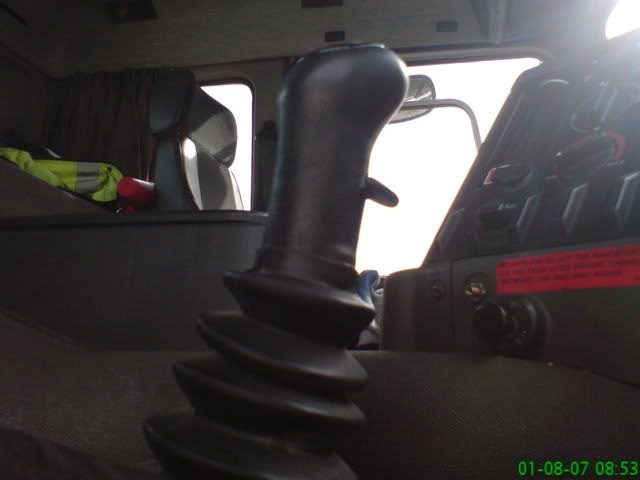
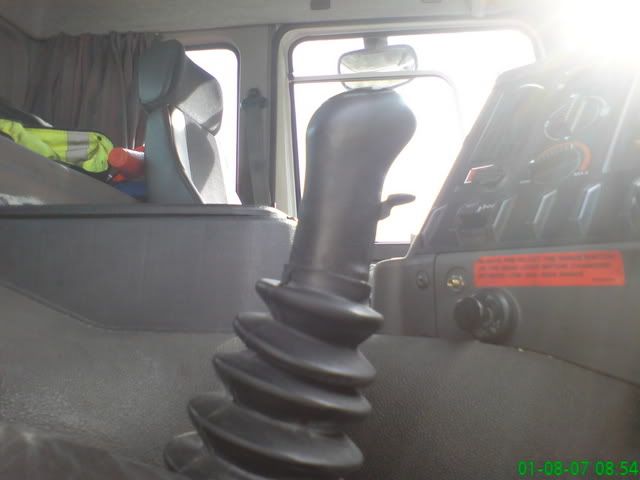
Wind down the (L)egs until the lowest leg touches the floor and then do one wind back with the handle and stow it in the holder. This prevents a big BANG as you pull the unit out and on the couple up, if the unit is not perfectly lined up with the trailer, it lets the trailer “float” so the legs do not gouge the floor — the DSA do not like their reverse area having chunks of tarmac missing!
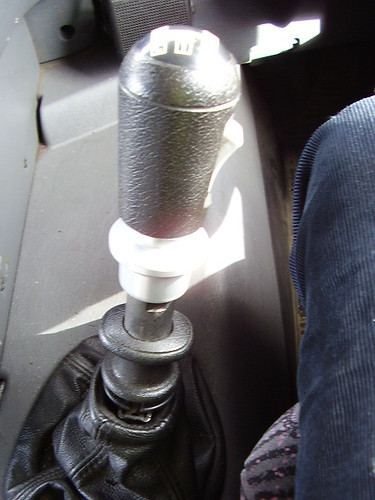
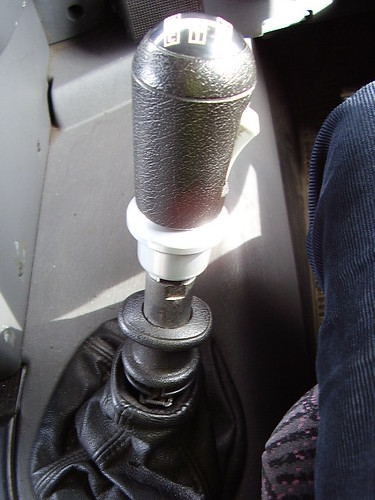
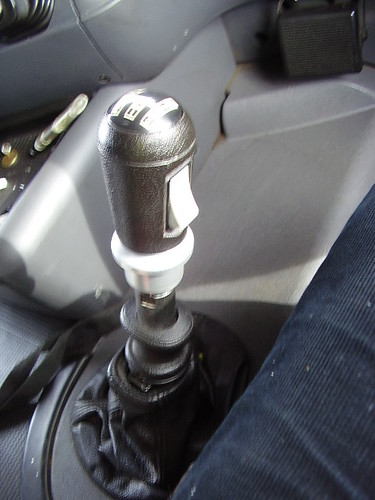
There are two aspects to the winding handle set up, the spigot and the handle. The spigot has 3 settings. Pulled fully out for normal windup & down, pushed fully in for super slow wind up & down and the middle of the two, which does nothing. The winding handle is used to pull or push the spigot. So, for normal winding down of the legs, pull the spigot fully out with the handle and then gently slide the handle back in along the spigot without pushing the spigot back in — this will now allow you to wind down the legs with one hand as the handle is locked along the spigot.
Now the (A)irlines & electric connections need to be detached from the trailer and properly stowed onto the holders on the back of the unit. On my set up there are 2 airlines and 3 electric ones. The red airline (see pic 4) is detached by turning the collar until the groove in it lines up with the little spigot, then pull the collar so the groove slots into the spigot and the red line will now release. The yellow airline (see pic 5) also has a collar and a groove, which will line up with a spigot, but this time the collar is pushed into the spigot to release it.
Two of the electric lines just pull out but the ABS electric line has a ‘trigger’ to pull underneath it (see pic 6) so it can release — this ‘trigger’ needs to be pushed forward to connect it properly onto the housing for it on the back of the unit.
Most units have steps to get up onto the back of the unit — use them and get down the same way — do not jump off — it’s very hard to carry on with a twisted ankle or worse!
At this point, all the work has been done on the nearside of the set up I use, so I now get the trainee to walk around the back of the trailer to get to the clip. Whilst passing the rear, they say, “remove number plate” to the examiner.
The (C)lip is a safety device that stops the kingpin handle from being pulled out. This is the bit where you usually get muck & grease etc on you!
Reach under the body of the trailer, above the rear unit axle and squeeze the lower part of the clip so that the top bit can be pushed up and out of the hole that it is slotted into. If you have a place to stow the clip, which is usually on a chain attached to the unit, then do so — it makes it easier to find on the couple up.
The (K)ingpin handle is now ready to be pulled out and is done by pulling it slightly forward and then fully out (two hands if struggling) with a slight back pull to lock it out. Do not mix up the kingpin handle with the plate slider handle (see pic 1) if your set up has one — your instructor will show you which is which.
Get back into the cab and engage a low gear to pull the unit from under the trailer, taking care not to drop the trailer the last inch, due to the legs not quite touching the floor, when the fifth wheel plate tilts up from the front of the trailer body.
Park the unit parallel to the side of the trailer, facing forward — the examiner might tell you which side to put it.

Stage two — the trailer check.
The examiner will ask you to pick up the trailer and to pretend that you have never seen this trailer before.
Get out of cab with keys and gloves.
Do a complete trailer check, just like the one you did before setting out in the morning, body, reflectors, doors, tyres, nuts etc, etc, with the addition of the fifth wheel pin check (see pic 3) as they may be a pin lock on it or something might be wrapped around it . Is the trailer MOT in date? Are the connectors for the air and electric lines damaged? On the walk around trailer check, tell the examiner what you are looking at, or touch (hence the gloves) all the areas that you are checking. That way, the examiner can see what you have checked.
MAKE SURE THE EXAMINER SEES YOU CHECK THE TRAILER BRAKE IS ON BY GIVING THE BUTTON A PULL.
Now, get back into the unit and whilst going forward in front of the trailer line up using both mirrors. Reverse towards the front of the trailer using both mirrors to line it up ( you should be able to see the same amount of trailer in each mirror as you do so ) and stop as close as possible without going underneath. Leaving the engine running (seems to be the accepted practice at this point as it is only going to be for a moment) get out of the cab and check that the fifth wheel plate will go just under the trailer (I get my trainees to do this with a flat hand, palm down gesture) and then lightly touch the fifth wheel handle to show that you know it is still out (has been known for some to spring back in!), then get back into the cab and proceed to reverse under the trailer.
You will feel and hear the locking of the unit to the trailer but to check that it is locked, engage a low forward gear and gently try TWICE to pull out.
Apply handbrake.

Stage three — the couple up.
Get out of cab with keys and gloves.
The word is K.C.A.L.B. (BLACK backwards) The (K)ingpin is already sorted — that locked in at the end of stage two.
Put the (C)lip back into the hole you took it out of on the uncouple.
Attach the (A)irlines and electrical connections. They are designed to fit only in their designated slots — you cannot fit them into the wrong one. The red airline is the hard one as there is air pressure to push against — a lot of trainees get their bum against the rear of the unit for extra leverage. The collars and pins of the airlines have to be lined up and slotted in for the airlines to fit onto their respective housings. Once connected, give the collars a twist for safety, so they are not left in line with the pins.
Wind up the (L)egs and stow the handle.
Release the trailer (B)rake.
Walk to the rear of the trailer and say to the examiner “number plate on and please would you check my trailer lights.”
Calmly, and whilst walking slowly back to your cab, check that you have done everything— Kingpin, Clip, Airlines etc, Legs, Brake & number plate■■?
Start engine, switch on dipped headlights and rear foglight(s) then do a separate indicator check (not hazards) and finishing with brake lights. Then, switch off all lights and the vehicle engine, and wait for the examiner to get back into the cab with you, where you will hear those nice words “I am happy to tell you that you have passed.”

Smart Mart:
The (successful) way I teach:-

UNCOUPLING

  1. Before uncoupling check that the ground is firm and level enough to support both the landing legs.
  2. Apply the parking brake on the trailer.
  3. Lower landing legs and secure handle.
  4. Remove and stow air lines and electric lines.
  5. Remove safety chain.
  6. Pull king pin release lever.

‘B L A C K’ Brake — Legs — Air lines — Clip - Kingpin

  1. Draw unit forwards clear of trailer (watching trailer in mirrors).
  2. Park the unit alongside the trailer about a doors width away, switch off engine and leave cab.
  3. Check that the landing legs are not sinking into the ground.
  4. Check trailer park brake.
  5. Remove number plate.

RE-COUPLING

  1. Reverse the unit up to the trailer stopping about 1 metre short of the trailer, using the mirrors to line up.
  2. Check the trailer parking brake is on and MOT is current, check the trailer over, in particular that lights are fitted and not broken, tyres are legal (1mm tread), wheel nuts secure (walk round checks).
  3. Check the height of the king pin is the same as the fifth wheel.
  4. The unit should be reversed slowly under the trailer, with the ‘kingpin’ lined up to the locking mechanism (watching trailer in mirrors). Listen to hear the fifth wheel lock onto the ‘kingpin’.
  5. Do a ‘tug test’. Try to drive forward slowly in a low gear to check that the fifth wheel is engaged (do this twice).
  6. Make sure that the parking brake of the unit is applied.
  7. Switch off engine, switch on sidelights and hazard warning lights and leave the cab.
  8. Inspect the locking mechanism to make sure it is secure.
  9. Fit safety clip (dog clip).
  10. Connect all brake hoses (twisting collars so that the pin doesn’t stay lined up) and the electrical supply to the trailer (susie’s). Check that they are secure.
  11. Wind up the landing legs on the trailer and secure the handle.
  12. Release the trailer handbrake
  13. Fit the number plate and check that the lights work.
  14. Ask examiner to check brake lights for you.
  15. Drive forward a few metres and check the brakes are working.

There is no particular order of removing or replacing the susies, although I do suggest connecting the red airline first as it is probably the most difficult and as has been mentioned in a previous post, susies get greased up, and therefore is is much better to ‘struggle’ with the red airline whilst keeping all the others off your trousers!

===================================================================================

Then there’s this from the FTA:
http://www.fta.co.uk/export/sites/fta/_galleries/downloads/health_and_safety/safe-coupling-guide.pdf

===================================================================================
COUPLING UP - When Trailers Bite Back

“Yeah sure, I learnt all about coupling when I did my test, but after watching the way the old hands do it. Why should I bother.” Partially true, but the very fact that they are old hands means that they have been coupling trailers on a regular basis for many years and have developed a feel not only of the vehicle, but also of their surroundings.

Even approaching the trailer, they have assessed the height of the pin, the gradient, what is to the rear, and the likelihood of anyone walking behind the trailer at a crucial time.

Nowadays we would call this a risk assessment. Formerley we would have referred to it as wisdom borne of experience.

SO JUST WHAT CAN GO WRONG?

The first consideration is the height of the trailer. It may have been parked at the correct height, but if it is on a bay, then is there is a chance that a Forkie has been running in and out of it. The trailer suspension tries to compensate for the changes in weight, the air supply becomes exhausted, the rear of the trailer settles, and the front goes up.

Try and couple up to that and there is a chance that the vehicle will pass underneath the pin, and as you push further back, the lamp lenses smash on the trailer legs, or even worse, particularly with a reefer and a sleeper cab, the fridge impales itself into the rear of the your vehicle causing damage to both.

At the other end of the scale is the trailer that is too low. Not all units are fitted with ramps leading up to the fifth wheel coupling. Finding this out when the front of the trailer has crushed your mudguards into the drive axle tyres, is a little too late.

So we have established that the height of the trailer is in the right proportion for our vehicle. Check the trailer brake?
“Nah, it wont move 'till I put the red line on. They never do.” Unless, of course, someone has opened the Shunt valve.

It’s bad enough taking down an old wall or a stretch of fencing, but what about the girl from the office that has nipped behind the trailer for a quick cigarette, out of sight of the Boss and the yard cameras. We all know smoking is bad for the health, but being crushed by a trailer is invariably terminal.

So now it’s time to reverse under the trailer. If you have air suspension on the trailer, lower it fully before going backwards. This reduces the possibility of damage to the mudguards and minimizes scraping grease off the coupling plate onto the leading edge of the trailer and thence onto the airlines.

“…he connected the red line and as I watched, both the unit and trailer started to roll towards a fence. He jumped clear as it gathered speed…”

If the trailer is fitted with a deep-set pin, and particularly if it is a reefer with a front mounted fridge, then this is the time you may choose to connect the airlines.

Leave the suspension down for now — not so far to climb up onto the catwalk and therefore, not so far to fall. If the vehicle is on a gradient and you have forgotten to set the parking brake, you will quickly notice and be able to rectify the matter. If you had lifted the suspension into contact with the trailer then the friction would most likely have held the unit UNTIL, and this again stresses the importance of checking the trailer brake, the red line was connected, when both would be capable of rolling freely with YOU being carried as a passenger.

Back at the driving seat, lift the suspension and WATCH for the trailer to lift. By lifting the trailer legs clear of the ground your are eliminating stresses created when the coupling is not accurately aligned with the pin, and also created when pushing backwards and tugging forward. Be aware that on a side slope there is a possibility of the trailer slipping sideways and it may be advisable to ensure that the pin is located within the V of the coupling before raising the suspension.

“…a good friend of mine hitched up to a 44 fridge in the normal manner. He then squeezed himself in between tractor / trailer to put on the airlines etc. He puts on his red line first and you already know when you do this sometimes the trailer can lurch forward a couple of mill, and there he was trapped (not hurt) but well stuck never the less…”

Push backwards until you hear the coupling engage. Select a low forward gear and tug forward twice. Fit the clip, or if the unit is fitted with a spring-loaded wedge, check that it has engaged properly. Fitting the clip is a final check of whether the coupling is fully engaged. If the clip don’t fit. It isn’t connected properly.

“…Doing it the same way every time also helps if you are distracted at anytime because all you do is go back to the start & check everything in the same order as you normally would.”

Connect the Suzy’s (if not already done). Wind up the legs and release the trailer brake. Don’t be too quick to walk off after releasing the trailer brake. If you have neglected to apply the parking brake and the whole lot starts moving, resist the temptation to run round to the cab.

Simply re-apply the trailer brake and wait. On some trailers the brakes will apply immediately, on others you may have to wait a few seconds. Either way, it is preferable to risk ending up under the wheels of the vehicle.

Return the suspension to normal ride height, fit number plate, and check lights, etc.

Develop a system that suits YOU for your sector of the industry and stick to it.

Uncoupling is largely a reversal of the whole procedure. If you have a mixture of surfaces and the trailer is to be loaded/unloaded by a Forkie, make sure the trailer overhangs the concrete area; otherwise you will not be popular.

Whether the trailer is uncoupled at normal ride height or ‘low’ is largely a matter of company policy, but rarely would it be normal practice for a trailer to be uncoupled with the drive axle suspension set high.

A mnemonic to remember is BLACK

Apply trailer BRAKE.
Lower LEGS.
Disconnect AIR and electrical lines.
Look and CHECK that everything has been done.
Release KINGPIN and pull slowly forward.

Remember:Lighthearted ribbing from your colleagues is less damaging to your income stream than a written warning from your employer.

Points to ALWAYS consider, particularly in isolated or quiet locations.
If I get injured, is there anyone nearby who can help me, and would they be able to hear me above the noise of the engine?
Is my phone in a pocket that I can reach easily, and do I know the name of the yard/road where I am?
Should I phone my office first, and then if they don’t hear back from me, they can contact someone to check on me.
Always be prepared to check, and check again…

Full credits to Krankee for the above.

THE ‘SHUNT’ BUTTON

Cruise Control:
not being an artic driver :blush: what is this “shunt button” that gets bounded about sometimes on here :question: what can you do with it turned on as apposed to when its turned off :question: :question: i realise its so you can “shunt” but what the need of the button :question: :question:
cheers

Coffeeholic:
It releases the brakes on the trailer so you can shunt it without connecting the airlines, the trailer will not be braked during this operation so all braking will be by the unit. As soon as you connect the lines the button should pop back out, it’s always best to check because if it doesn’t there are no brakes on the trailer while you head of down the road. Also if you dropped it on a bay you would need to pull the shunt button back out otherwise as a forklift drives in the back the unbraked trailer can roll forward.

RETURN TO INDEX

This Test report Sheet is used for all DVSA tests so there are some sections which are not used on the LGV test.

Summary of DVSA fees and charges

SHOW AND TELL

LGVTrainer:
I am about to start a series of posts explaining both to candidates and trainers what actually happens on a test. The DL25 is the form the examiner has on his lap throughout the test. I will post every few days with another box on the form.
Let’s start at the beginning. Show/tell questions. On a LGV test you will be asked 5. 3 show me questions and 2 tell me questions. Each incorrect answer will earn 1 driving fault (minor) get all 5 wrong it’s a serious fault. I’ve never seen that. But I have seen 16 faults (fail) where 1 was a question so learn them all.
Next time I will discuss reversing faults. That is probably more interesting.

MIRRORS - CHANGE SPEED

LGVTrainer:
Following on from previous subjects this is an often misunderstood part of the test. But what exactly does Mirrors Change speed mean.
Generally it is assessed when slowing down but it can also apply when accelerating.
It will not be assessed when you need to slow in an emergency or even when the lights change to Amber, it is more when you get to choose when to slow down.
For example you are asked to pull up at a safe or designated place. Without checking mirrors you apply left signal and pull up. Was anybody behind you before you slowed down? Do you know? The examiner will know. Based on what is there you will be assessed. With no mirror check you will not be assessed as No Fault so you leave yourself at the mercy of the gods.
Another example. You’re in a National speed limit but ahead is a 30 or 40mph speed sign. You see the sign late and brake in time. You feel great because you slowed in time but did you check the mirrors before you slowed down? The examiner did and again he assesses the situation.
Another one. You’re in a 30mph road and it changes to a 50mph. Without checking you accelerate but what you don’t notice is a car starting to overtake you. Because you accelerate he struggles to pass you and there’s traffic coming towards you.
Mirrors change speed is important for the above and many other reasons. It’s basic, check your mirrors before changing speed.
Hope this helps

JUNCTIONS - OBSERVATION

LGVTrainer:
Continuing on with this series of explanations into the DL25 this is a Very Important element to understand. Firstly for Observation to be marked, your vehicle MUST have crossed the white give way line. Any faults before this point will be marked elsewhere on the sheet for example approach speed or turning left / right or road markings etc.
Observation doesn’t mean you didn’t see another vehicle, it means you didn’t take effective observation and act correctly on what you did see. It happens regularly at roundabouts where a candidate thinks there is enough room to pull out in front of a vehicle already coming round. If you pull out and there is no other vehicle visible whatever happens after, you should not be marked. Examiners will make an assessment based on what could be seen at the moment you choose to go. Of course it’s not only roundabouts, it can just as easily be at a give way or Stop sign at any road junction.
So what needs to happen to get marked? As always there are 5 levels of fault:-

No Fault - Your action has no effect whatsoever on another vehicle
Not worth of recording - There is a vehicle visible but your action causes absolute minimal effect to the other road user
Driving Fault - Its possible the other driver needed to lift off the accelerator to allow you to clear his path but there was just about enough space
Serious Fault - The other driver clearly had to brake or change direction to avoid you
Dangerous Fault - There is a high possibility of a collision and may need the examiner to take verbal or Physical action to prevent it happening
So crossing the give way line is the point of no return, the commitment point. It can’t be undone. Before crossing that line with your vehicle you must be absolutely sure that you wont fall into the last 2 levels above. If you are not sure then don’t go. Many candidates worry about getting marked for Progress or undue hesitation but it is extremely rare to receive a serious mark for either based on just 1 situation.
Approach speed is often the underlying root of the problem because the candidate is reluctant to stop from a high speed and can easily misjudge the time it takes to get a LGV vehicle clear of the situation.
In my experience this is the NUMBER 1 cause of test failure but it’s not really that difficult. If you can see another vehicle approaching don’t cross the white line.
Hope this helps a few people.

SIGNALS

LGVTrainer:
This is an interesting subject. The form has 3 elements connected with signalling. Give signal NECCESSARY, CORRECTLY, TIMED
NECCESSARY - This is most commonly marked when a candidate does not give a signal when it would have helped someone. For example when exiting a roundabout and vehicles are waiting to emerge from the road you are leaving on. Before changing lanes when other vehicles would benefit from a signal. When turning left or right and vehicles are waiting to leave that road. It is absolutely not NECCESSARY to signal when nobody would benefit from it, however with limited vision around the truck most trainers will teach to signal anyway.
CORRECTLY - Of the 3 this causes most problems. Leaving a signal on after it has served its purpose can be fatal. For example you exit a roundabout with a left signal but don’t cancel it afterwards. The first few seconds is not worthy of recording. Then longer than that moves to a driving fault. Now imagine the left signal is still on as you approach a road on the left with cars trying to pull out. Reasonably they might expect you to turn left so they respond to signals by other road users but you’re not turning left. You forgot to cancel the signal after the roundabout. What do you expect the examiner to mark as a near miss happens?
TIMED - Too late too early with the signal. You intend to take the 2nd road on the left/right but put a signal on before the 1st road. A car pulls out expecting you to turn. You intend to turn right at a roundabout, 3rd exit, but put the left signal on before you even pass the 2nd exit.
This is a large complex subject. If you’ve got a test coming up learn about Signals. Once you understand if to signal and when to signal and why to signal you’ve mastered a key subject.

REVERSING

LGVTrainer:
The reverse exercise is normally done before the road drive but it can be done at the end occasionally for several reasons, especially at a busy test centre with several examiners all using the same reversing area.
The DL25 has 2 marking areas for the reverse. Control and Observation.
CONTROL - You will receive a serious fault for control if either any of the vehicle tyres COMPLETELY crosses the area boundary lines (touching a line would be marked as a driving fault) Or making contact with any cone or marker pole Or not finishing with the rear of the vehicle within the yellow/black hatched area before the barrier Or taking too many forward shunts to re-position the vehicle. There are 2 types of forward shunt, a comfort shunt which was not really necessary will not be marked or a corrective shunt which is taken to correct a misjudgement will receive a driving fault. There is no set limit to the number of shunts permitted but generally 2 should be regarded as the maximum. Touching the barrier at the back is Not a fault provided the barrier is fully upright at the end of the exercise.
OBSERVATION - All round observation should be maintained throughout the entire exercise to avoid receiving a fault. The examiner can only mark the fault once and will wait until the exercise is over before deciding the weight of the fault.
IMPORTANT
All actions are judged in 1 of the following fault weights
No Fault
Fault not worthy of recording
Driving fault
Serious fault
Dangerous fault
Either of the last 2 will result in failing the test

GUIDANCE FOR DRIVING EXAMINERS

RETURN TO INDEX

From member GlesgaBill
Hi folks!

Having been a member of the forum for a wee while now and having passed my Cat C in 06, i have learned a lot since then and would like to offer the following advice/tips i have learned in my time so far (i still consider myself as a noob even after 2 years at it, but so far so good…no major happenings thus far)

I know this will probably be read by the more experienced among us-and as such, please feel free to add/critique where you feel appropriate…constructive criticism will be most welcomed.

As mentioned, i would offer the following advice to the noobs as amongst, from my noob self-

*Do NOT try to drive your lorry like your car. It simply will not handle the same!!

*Check that your vehicle is roadworthy every time before you take it out…and report your defects!

*Watch your approach speed at junctions/roundabouts/crossings etc-slow down to a pace that will let you maneuver your vehicle without having to be jumping on the brakes.

*Respect your load-the load will respond to your choice of movement. I mostly drive palletised freight- if you drive erratically, your load may well respond the same. If you drive a smooth drive, your load should arrive as intended.

*Secure your load whenever & wherever possible.-Items come in all shapes and sizes-a well shrink wrapped pallet of bolts one box high will sit better than beer bottles stacked 2 metres high…beware highly stacked items. Also, try not to leave gaps between pallets. If you have a pallet truck etc or a kind soul you can ask with a forklift, ask them to shift a pallet for you so they are together and not liable to fall should harsh braking be needed.

*Mirrors! mirrors! mirrors! mirrors!
Not just there to check if your sunglasses look good…LIVE in them. Always apply mirror,signal, maneuver. Always check your blind spots and always look for cyclists&smaller vehicles especially when turning left. Oh…and stay off the kerbs!

*Reversing-Again, mirrors will be your friend here. EVEN IF SOME-ONE IS GUIDING YOU. Do NOT take it as read that the person reversing you will do so safely. They’re not driving the lorry, YOU are. If necessary, get out and take a quick look at where you want to be. It’s not a race to reverse your lorry-put emphasis on doing it SAFELY without cost to persons/life, property or your lorry. If it takes a few extra minutes, then so be it.

*Safe loading of your lorry-The weight you are carrying should be distributed in a manner that ensures that neither axle(s) or indeed the whole vehicle are overloaded. ie if you’re driving a 17 tonner, don’t have 6 tonne of marble at the headboard! If in doubt, ask-even on here, people will give you advice on how to tell if you are running safely or not. Remember-YOU are responsible for the load you take on the road…not the forklift guy in the depot who might have loaded it like a pound of mince-correct your load if required.

*Do your homework-Make it your business to know the legislation that will affect you as an HGV driver. Namely, “Driver’s Hours Legislation,” & " The Working Time Directive"-You should familiarize yourself with at least these two pieces of legislation as they will affect your everyday activity as a driver. Others may well follow(ADR etc) but as a noob, you should at least learn what matters regarding breaks etc. Don’t just rely on asking a fellow driver, or even people in your Transport Office (they have been known to [zb] people like us)-Check the legislation as provided by the regulatory bodies, and check for updates! There are several links on here to MOST(if not all) of the legislation that could apply to you if you are a trucker.

*Do something “better” each day-Try to make your day run as smooth as possible, improve where you can in any areas of your driving where you feel it may be needed. Try and drive a smoother/better drive than you did yesterday.

*Use this forum regularly. You will learn a lot of valuable information on the forums on here through other noobs experiences, and from very experienced qualified drivers. There are good folks on here who are qualified to inform you in depth of many of the aspects of trucking-off the top of my head, Coffeholic, Diesel Dave & Rog…they’ve never failed me so far! :wink:

Lastly,
Enjoy the freedom of the open road! (safely) :wink:
==================================================================================
From member burntoutbanger
As a noob myself, (passed in March, been doing multi-drop in 11-13 tonners in rural areas since), I’d just like to say one of the biggest differences I’ve found between car and lorry driving is height.

As noobs we all probably take a bit of time coming to terms with the width and length of lorries but at every corner, junction and roundabout we gain a bit more experience and get better doing it.

If you’re doing a lot of small town/country lane driving it’s essential you pay attention to your vehicle’s height. There are a lot of branches and street furniture out there not to mention overhanging roofs and second floor bay windows. These hazards tend not to have a warning plate with their height on attached. :open_mouth:
==================================================================================
From member Secretelephant
Too true about bridges. It’s so easy to drive into a low one.

Having been doing class 2 work for nearly a year now, I’d like to add this:

Dont worry too much if you cant complete your delivery schedule.

The amount of time I’ve been given a ridiculously over ambitious run. When you don’t complete it as a noob you think it’s you fault & sometimes gaffers & / or controllers will blame you for missing a drop & bringing back some of your freight.

With a bit of experience under your belt though & after talking to other drivers you soon learn that it aint you.
Trucks are very slow compared to cars especially off a motorway when you are often restricted to 40mph. When you add in things like A*holes who take forever to load / tip you, traffic jams. & getting lost, your “Easy” trip can soon turn turn into a 15 hour ball breaker.
The last thing you want to do as an inexperienced driver is try & drive quickly. Especially in a truck.

I made this mistake as a rookie bus driver when i was running late , & ended up knocking over two road signs. :blush:
No harm done. but it could have been a lot worse. :imp:

RETURN TO INDEX

2019 VIDEO BLOGS FROM A NEWBIE LADY TRUCKER

tonka236 - Theory tests, first pre practical training assessment, C training & test
tonka236 - WAGON & DRAG C+E training & test

SadMike’s training blog for ‘C’
SadMike’s training blog for ‘C+E’

BigJon - 5 Days of C training & test
BigJon - WAGON & DRAG C+E training & test

C training blog by DriverJohn
C training blog by mknutjob
C training blog by punchy
My Training Experience - C Class Passed 1st Time by MAT
C Training blog by spd0121
C Training blog by johnny boy 1
C Training blog by animal (Female)
schrodingers cat C TRAINING BLOG
SuperLez C TRAINING BLOG
NewBloods’ C TRAINING BLOG
Tetleys C test - What a day!!
MADBAZs C training blog

C+E Training & test pass blog by garnerlives
C+E Artic training & test by clarkyboy
8WHEELS ARTIC C+E TRAINING BLOG
CE ARTIC TRAINING BLOG by Gibisa

Wills Journey - Theory - C - C+E = Job
COLS TRAINING BLOG

VARIOUS SMALL TEST BLOGS (PASSES & FAILS)

A NEWBIES FIRST DAY ON THE JOB!!

RETURN TO INDEX

RATCHET STRAPS

ANOTHER RATCHET STRAP VIDEO - External link

CHAINS
RATCHET TYPE CHAIN TENSIONER

Yellow arrow is pointing to switch which is pushed in order to change to either tighten or untighten.

LOCK-OVER CHAIN TENSIONER WARNING - These can be dangerous

A holow steel bar, such as a 4 foot scaffold tube, is put over the handle for extra leverage.

ROPES

How to tie a trucker hitch (DOLLY KNOT) -

RETURN TO INDEX

SOME USEFUL LINKS
TRUCKERS HANDBOOK
Digital Tachograph Simulator and Instructions.
HOW TO INSERT ANALOGUE TACHOGRAPH CARDS
Some ARTIC and W&D reversing VIDEOS including a collection with explanations
EASY GUIDE TO DRIVERS’ HOURS

RETURN TO INDEX